1. Settings & Data
Every setting lives on your device. Dive Tools has no server, no account, and no third-party trackers - nothing you type leaves your browser unless you explicitly export it. The app records only anonymous, cookieless, aggregated usage statistics (which calculator you open, your language and units, coarse country); nothing personal, nothing stored on your device. See the privacy policy for details. Reach everything in this section through Settings, which sits in the app menu described just below.
1.1 Getting around: the menu
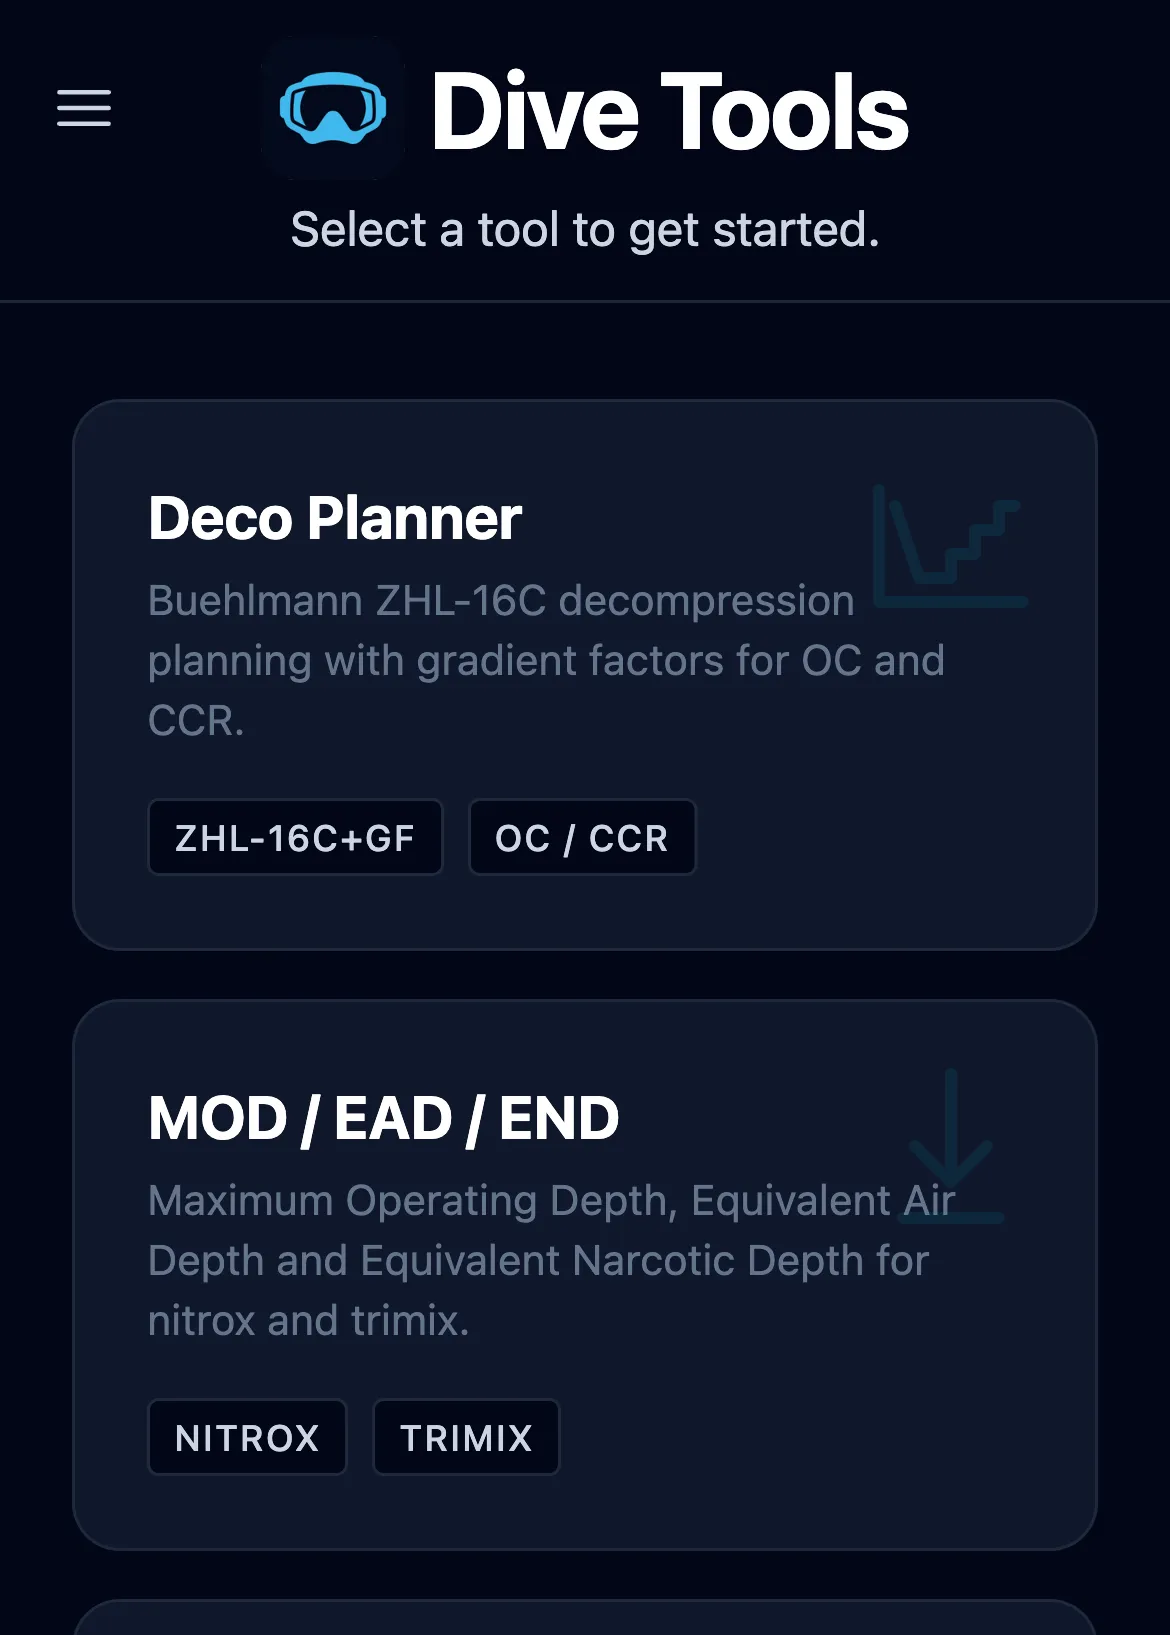
The start screen lists every tool as its own card: Deco Planner, MOD / EAD / END, Gas Density, PP Blend, Top-up and Checklists. Tap one to open it. The header above the cards stays put while the list scrolls, so the menu button never scrolls out of reach.
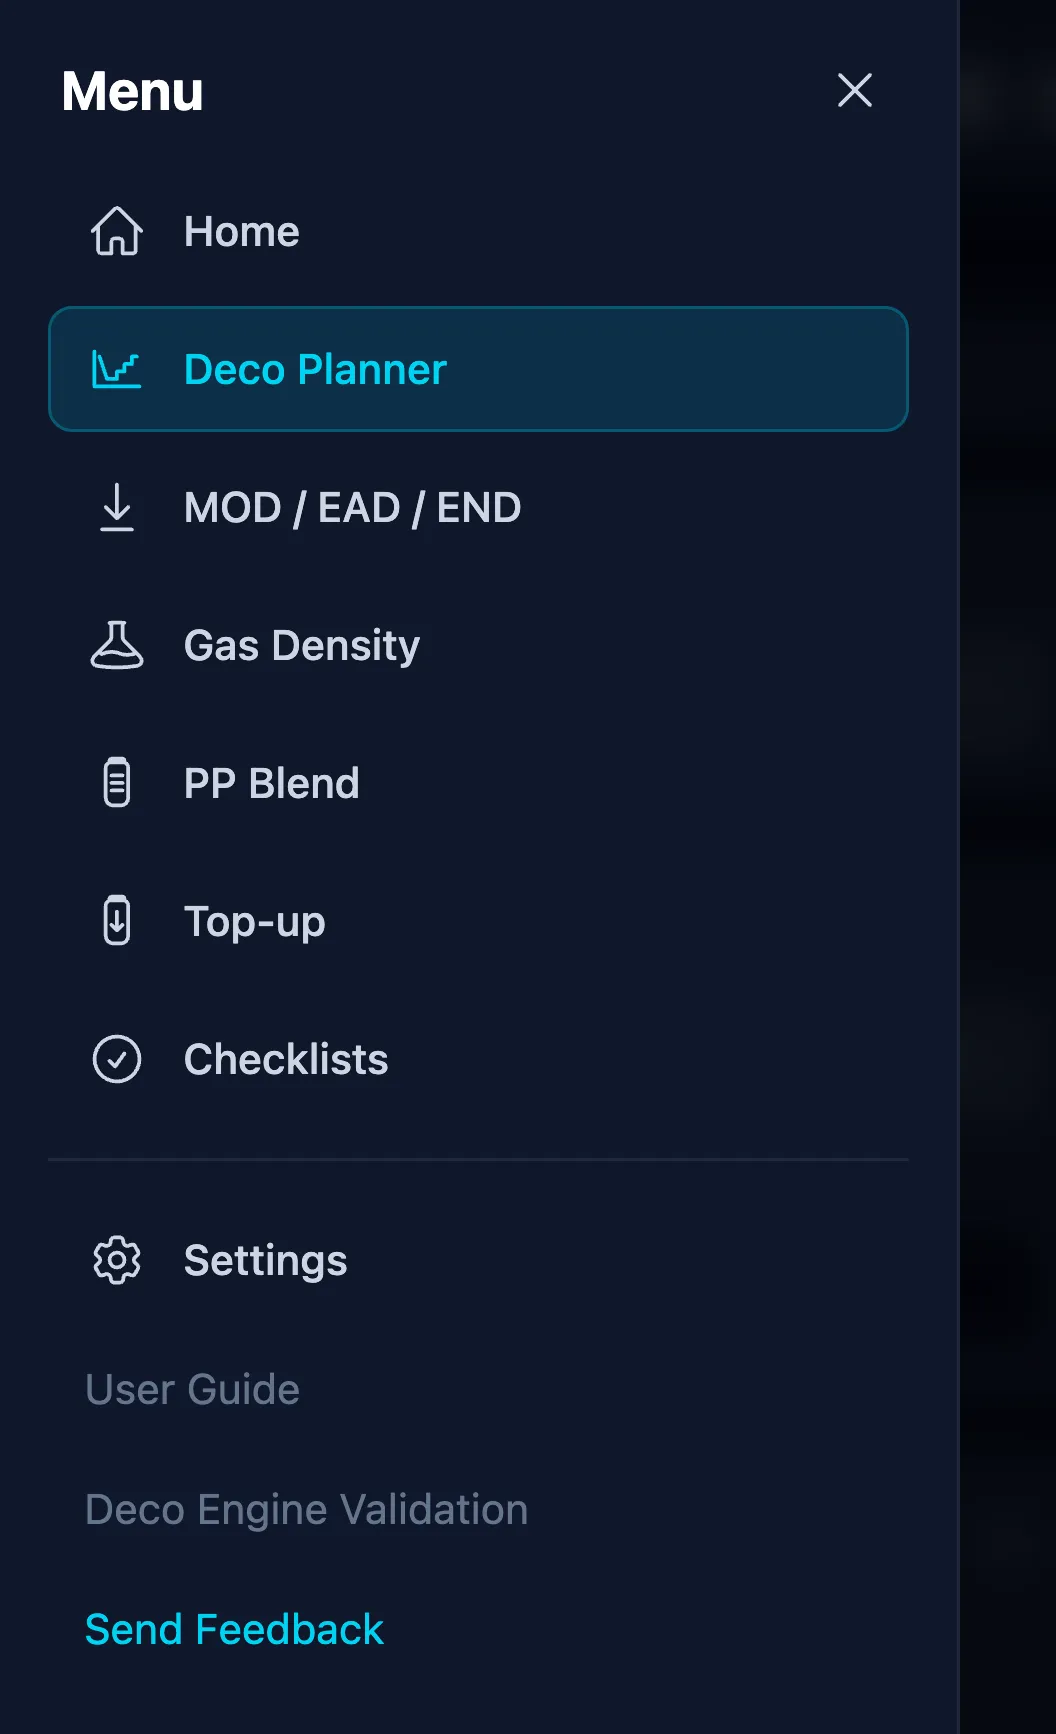
From inside any tool, the menu button in the top-left corner opens the app menu, and that is how you get everywhere else. There is no back arrow to tap through and no selector screen in between: every tool is one tap from every other tool. The menu holds, in order:
- Home, then all six tools, with the one you are on marked
- Settings - theme, language, units, the order of the cards on the start screen, and Backup & Restore (1.3 and 1.4)
- Links to this guide, the engine validation report, feedback by email and the privacy policy. These four live on the website rather than in the app, so offline they appear greyed out with a short note instead of sending you to a browser error page. Everything the app itself does keeps working offline.
- The version number, which also opens the changelog
Two screens deliberately have no menu button: the checklist builder and a checklist in progress. Both hold work that leaving would discard, so they keep their own exit button, which asks first. On Android, the system back gesture takes you to the start screen.
1.2 Installing the PWA
Dive Tools is a Progressive Web App - it works in any modern browser and can be installed as a standalone app with full offline support.
Android (Chrome, Edge, Samsung Internet): open www.divetools.app/app/, then either tap the Add to Home Screen button in the app's Settings panel, or use the browser's three-dot menu → "Install app". The app appears in your launcher and opens without browser chrome.
iOS (Safari only): open the app in Safari, tap the Share button, then "Add to Home Screen". Other iOS browsers cannot install PWAs.
Desktop (Chrome, Edge): look for the install icon in the address bar, or use the three-dot menu → "Install Dive Tools".
macOS (Safari 17 and later, so macOS Sonoma and up): open the app in Safari and choose File → Add to Dock. Safari turns it into a web app with its own icon in the Dock and Launchpad, running without an address bar and working offline like any other install. Note that the Add to Home Screen button inside Settings does not appear in Safari on the Mac: it is driven by a browser feature only Chrome and Edge provide, so the File menu is the way in.
Once installed, the app works offline - on a boat, in a cave lodge, at 3000 m altitude with no signal. New versions update silently on the next open; there is no prompt, no update button, and the update does not wipe local storage.
The installed app follows your phone's rotation, so it can be turned sideways. That is worth doing for the dive profile in particular, since a depth-and-time chart wants a wide screen. Your phone's own Auto-rotate lock still decides; Android sometimes keeps its old setting until the app is reinstalled.
1.3 Units, theme, language
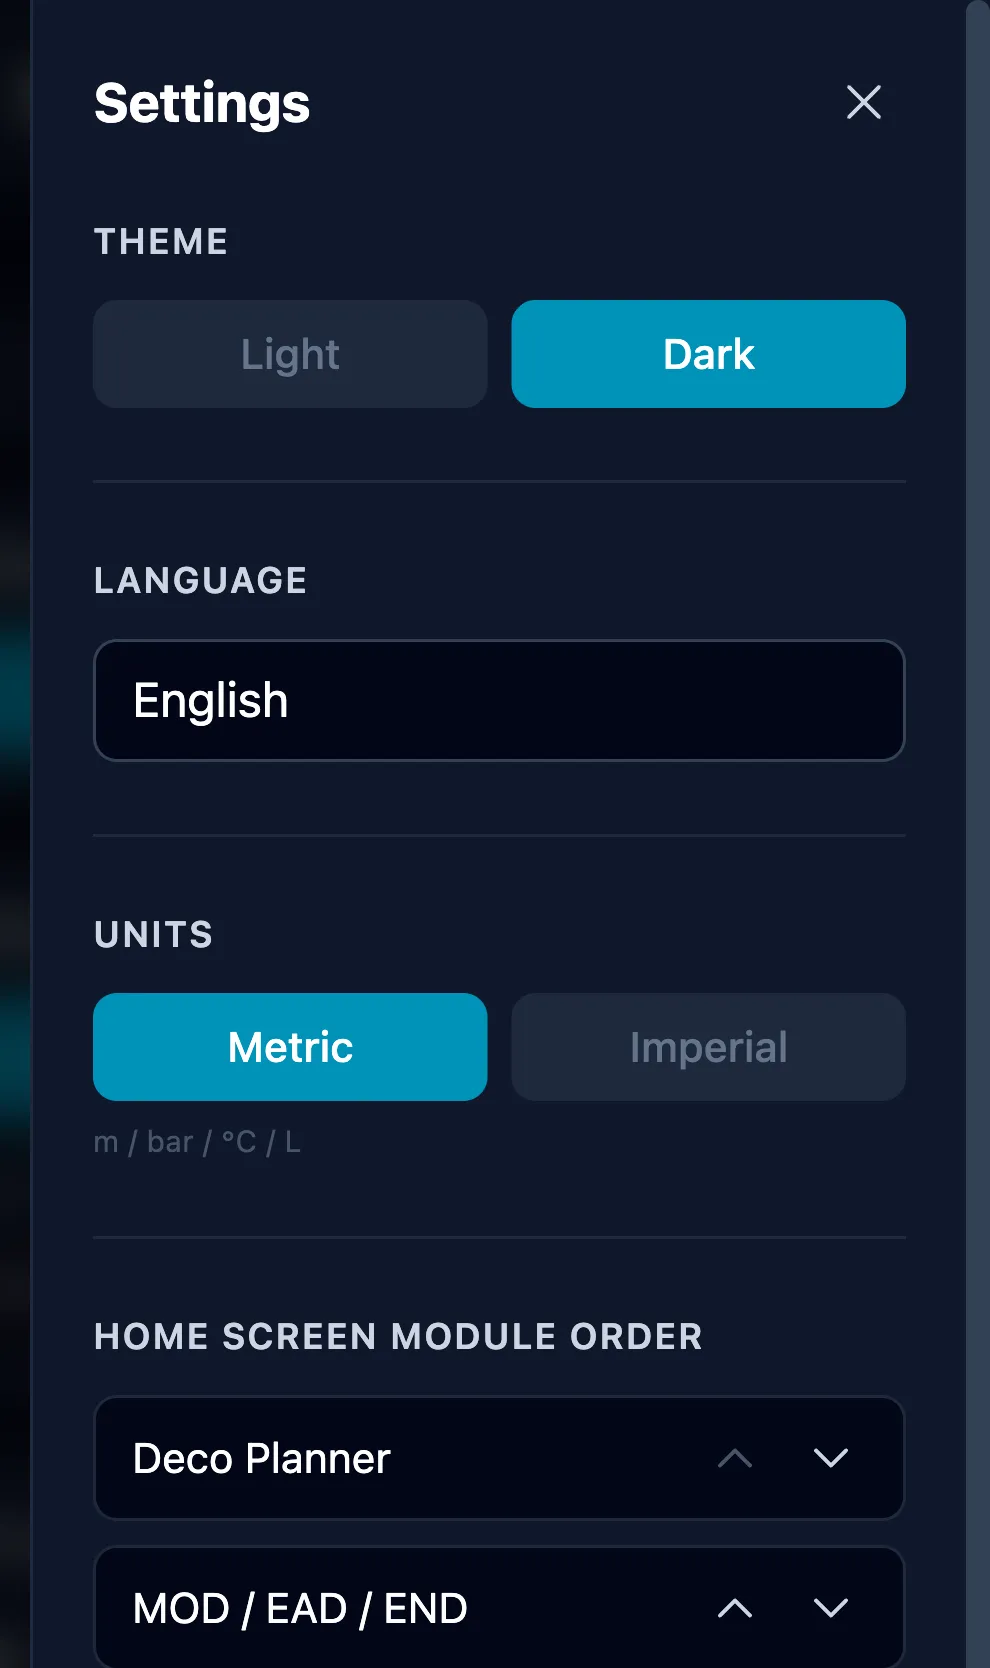
Units - switch between metric (m, bar, °C, L) and imperial (ft, psi, °F, cuft). Every input, output, chart, and export updates instantly. Values are always stored in metric internally, so swapping units never drifts your numbers.
Theme - dark (default) or light. Applied immediately to the whole app.
Language - English, Czech, German, French, Spanish, Italian, Polish. The dropdown affects labels, warnings, and exports.
Home Screen Module Order - use the up/down arrow buttons next to each tool to reorder the cards on the start screen. The menu lists them in the same order.
The app remembers what you typed. Every calculator except the checklists keeps its inputs when you leave the screen and across restarts: the mix and ppO₂ in MOD, PP Blend and Top-up separately, the Gas Density setup, and your working dive plan in the Deco Planner. That last one matters most, because the plan used to be lost whenever the app updated itself in the background. This is per-device working state, not a setting - see 1.4 for what does and does not travel in a backup.
1.4 Backup & Restore
Because all state is local, you are responsible for moving it between devices or keeping a backup. The Backup & Restore block exports everything as a single JSON blob.
Copy Settings to Clipboard writes one JSON that contains:
- Every Advanced setting in the Deco Planner - GF, rates, RMV, water density, altitude, ICD, CCR loop volume and O₂ metabolic rate, gas switch extra time
- Custom gas presets (bottom, deco, bailout, top-up), custom GF presets, and gas prices
- Custom cylinders and which cylinders are enabled or hidden
- Every custom checklist and any in-progress checklist state
- Your Saved Plans (see 2.8) and the blending start temperature
- Units, theme, language, tool order
Paste the same JSON into Restore Settings on another device or after clearing browser storage, and the app rehydrates to the exact same state.
What the backup deliberately leaves out is in-progress work rather than settings: the inputs currently sitting in each calculator, the working dive plan, and any unfinished repetitive-dive chain (2.9). Those are kept on the device so nothing is lost when you close the app or it updates itself - but they are not the sort of thing you would want overwriting a second device. Anything worth keeping belongs in a Saved Plan.
Good practice: after a weekend of trip planning, copy your settings and keep the JSON in a note or cloud file. If you change browsers, wipe site data, or switch phones, you are one paste away from your full setup.
2. Deco Planner
The Deco Planner computes decompression schedules using the Bühlmann ZHL-16C algorithm with gradient factors. It handles single-level and multi-level profiles, open circuit and closed circuit rebreather, cave exits, and CCR bailout - all offline, on your device. The engine is cross-checked against Subsurface, MultiDeco and Shearwater across 16 reference profiles - see the deco engine validation report.
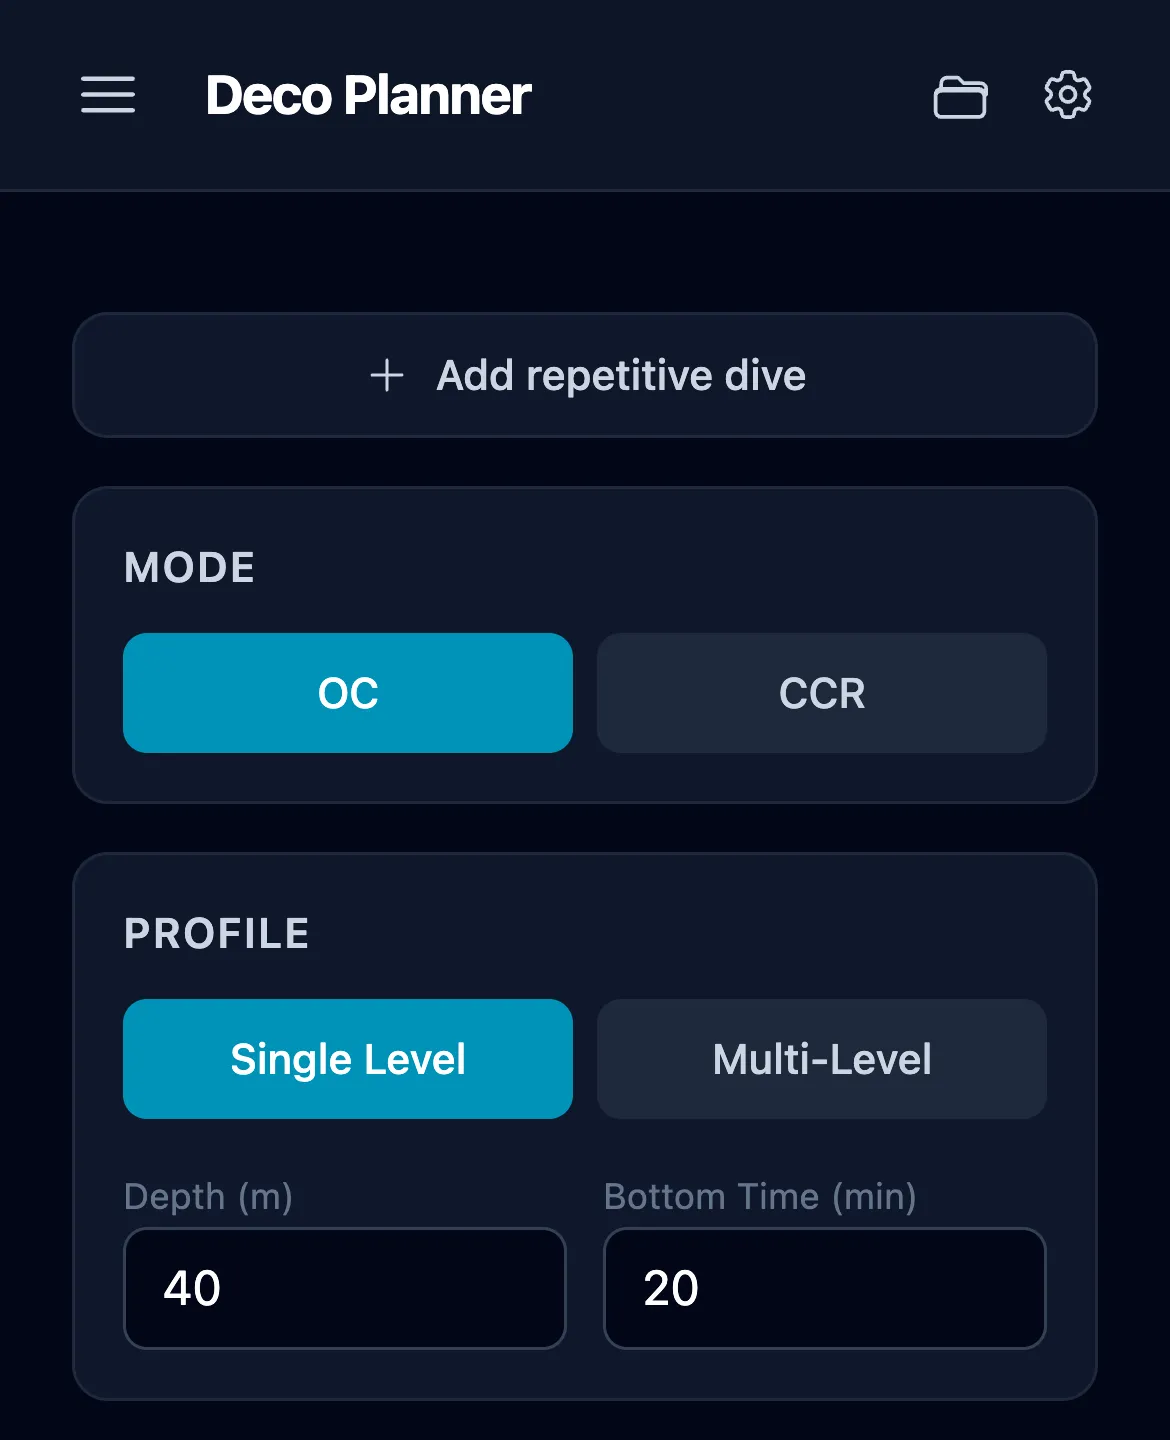
The top area holds the primary dive inputs (mode, profile, gases). Two icons sit top-right: the folder opens Saved Plans (2.8) and the gear opens the Advanced drawer where every tunable parameter lives. Those two are specific to this screen; the menu button on the left of the same bar leads out of it (1.1). Above the Mode toggle you will find Add repetitive dive, which chains several dives in a day (2.9). Scroll down on the main screen to see the runtime plan and results.
2.1 Mode: OC vs CCR
The first choice is breathing loop. Toggle OC (Open Circuit) or CCR (Closed Circuit Rebreather) at the top of the screen.
OC breathes each gas at ambient pressure; deco schedule is driven by the gas selected for each phase of the dive.
CCR holds a constant oxygen partial pressure - the setpoint - by injecting O₂ into a recirculated loop. Values are in bar; the planner accepts 0.5 to 1.6. The planner treats the diluent as the inert carrier and the setpoint as the ppO₂ component of the breathing mix at every depth.
Variable setpoint. On single-level dives you can enable a phase-based setpoint instead of one fixed value. The planner then uses a Surface SP, a Descent SP (held on the bottom), and an Ascent SP, switching to the ascent setpoint at a depth trigger you set. This mirrors real CCR practice of running a lower setpoint on descent and a higher one during deco.
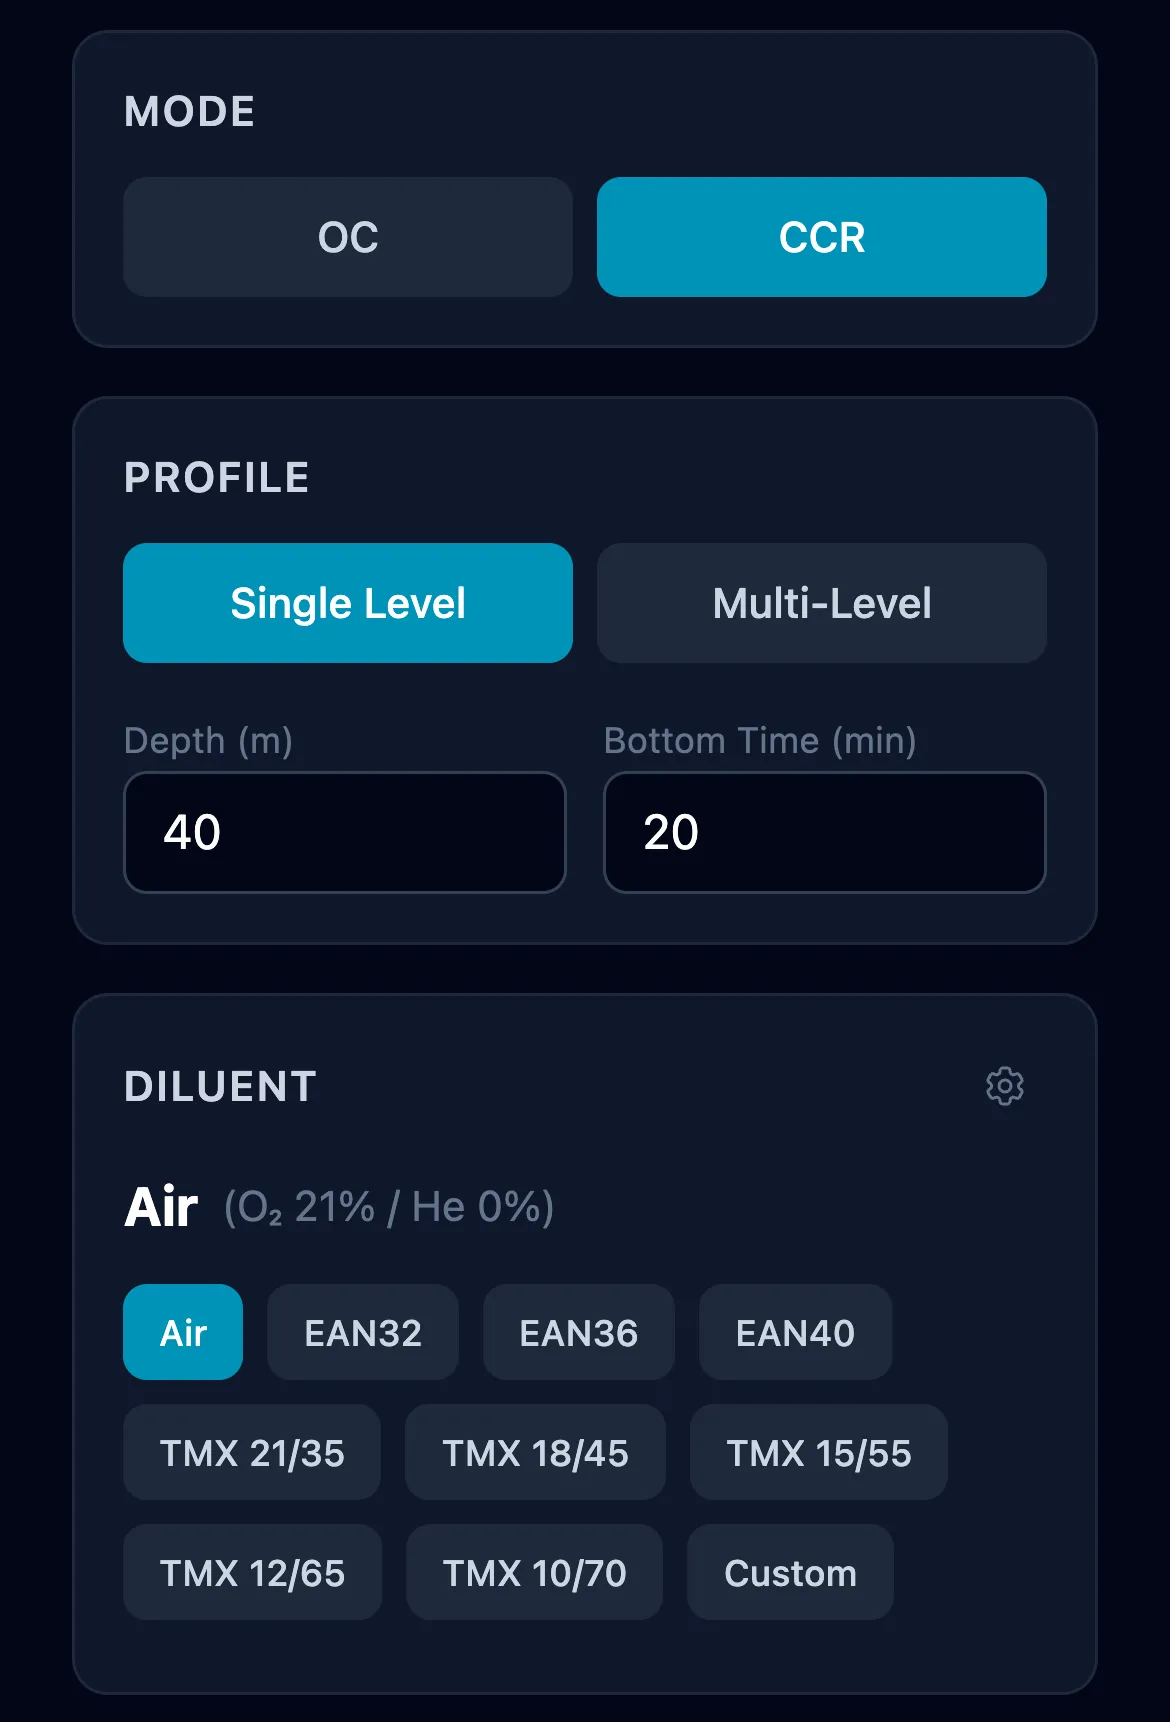
Gas density caveat for CCR. At the setpoint you chose, the effective mix at depth can still exceed the 5.2 g/L soft limit or 6.2 g/L hard limit. The Gas Density calculator (section 3.1) is the right place to pre-check any setpoint / diluent combination before you plan the dive.
2.2 Profile: Single vs Multi-level
Single-level - one depth, one bottom time. Fast for standard square-profile dives.
Multi-level - any number of segments. Each segment has an end depth (To), a duration, and its own gas. The start depth (From) is read-only and derived automatically: segment 1 always begins at the surface, and every later segment starts where the previous one ended. You only edit To, so the profile is always continuous - you cannot accidentally leave a gap between segments. Use this for real-world profiles that are not square - wall dives, cave penetrations with depth changes, wreck swim-throughs.
Segments can also be gradual (sloped over time) rather than instant depth changes, so a slow descent or a gentle upslope is modelled as a continuous transit instead of a vertical jump.
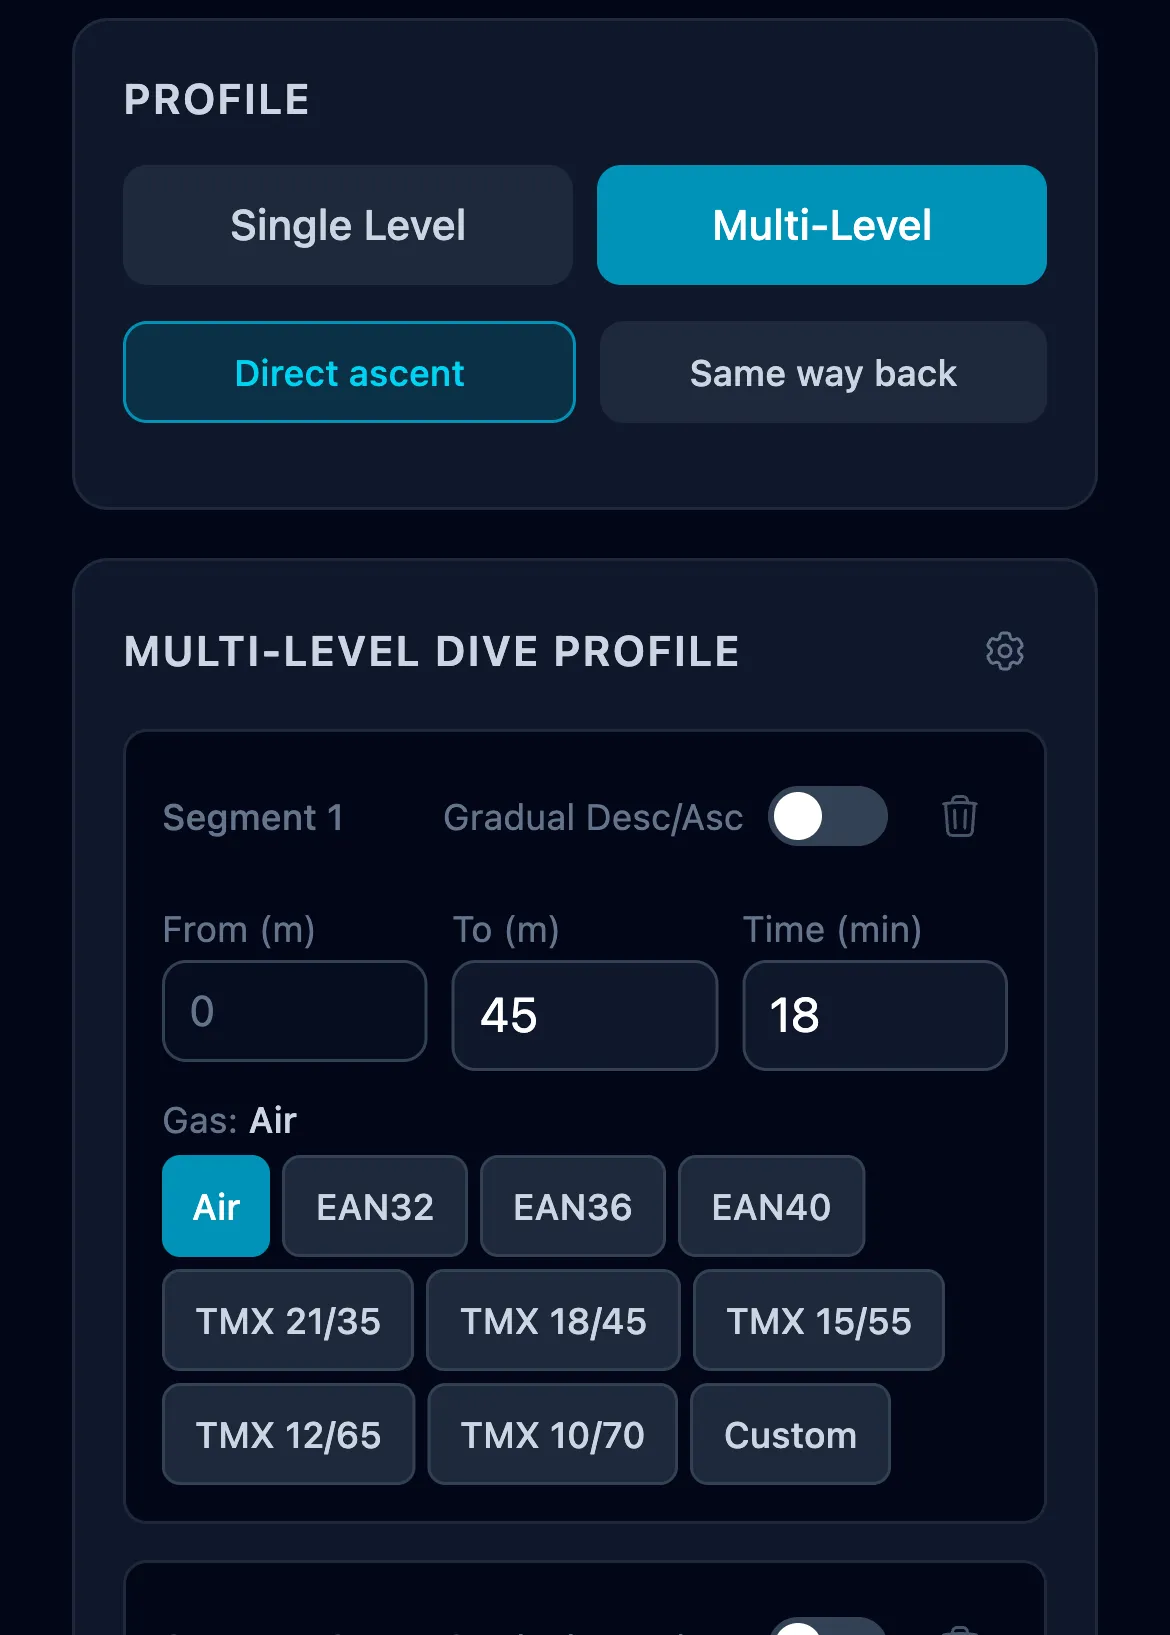
Multi-level has one more choice: Direct ascent or Same way back (cave mode). Direct ascent is the usual convention - after the last segment you go straight to the surface following deco. Same way back is for cave and overhead environments where you must return along the same profile you entered on. The planner then:
- Treats the deepest forward segment as the turn point
- Mirrors the segments in reverse on the return leg
- On OC, narrows the cave-return gas pool to each segment's declared gas plus non-bottom deco gases - it will not silently swap to a richer bottom gas above its MOD
- On CCR with a bailout plan, activates the bailout at the turn point, so the whole return leg runs on OC
Same way back also exposes an exit time multiplier: scale the modelled return-leg duration for DPV or scootered exits where you cover the same distance faster than swimming in. An always-on caution reminds you that a real exit may be longer than planned and require more gas than calculated, so the multiplier is a planning aid, not a guarantee.
2.3 Gases
The Gases panel changes its sections depending on the mode you picked in 2.1. OC shows Bottom gas + Deco gases. CCR shows Diluent + Bailout gases (the bailout list appears only when the Bailout toggle is on).
Every gas list follows the same interaction pattern: preset chips for one-tap add, a gear icon to manage the preset library and define custom mixes, and a trash icon to remove a gas from the active list. Labels are color-coded by O₂ content - hypoxic trimixes violet, normoxic mixes blue, enriched mixes cyan, deco mixes emerald, pure O₂ lime. The same palette appears in the runtime plan so gas transitions are easy to spot.
OC - Bottom and Deco gases
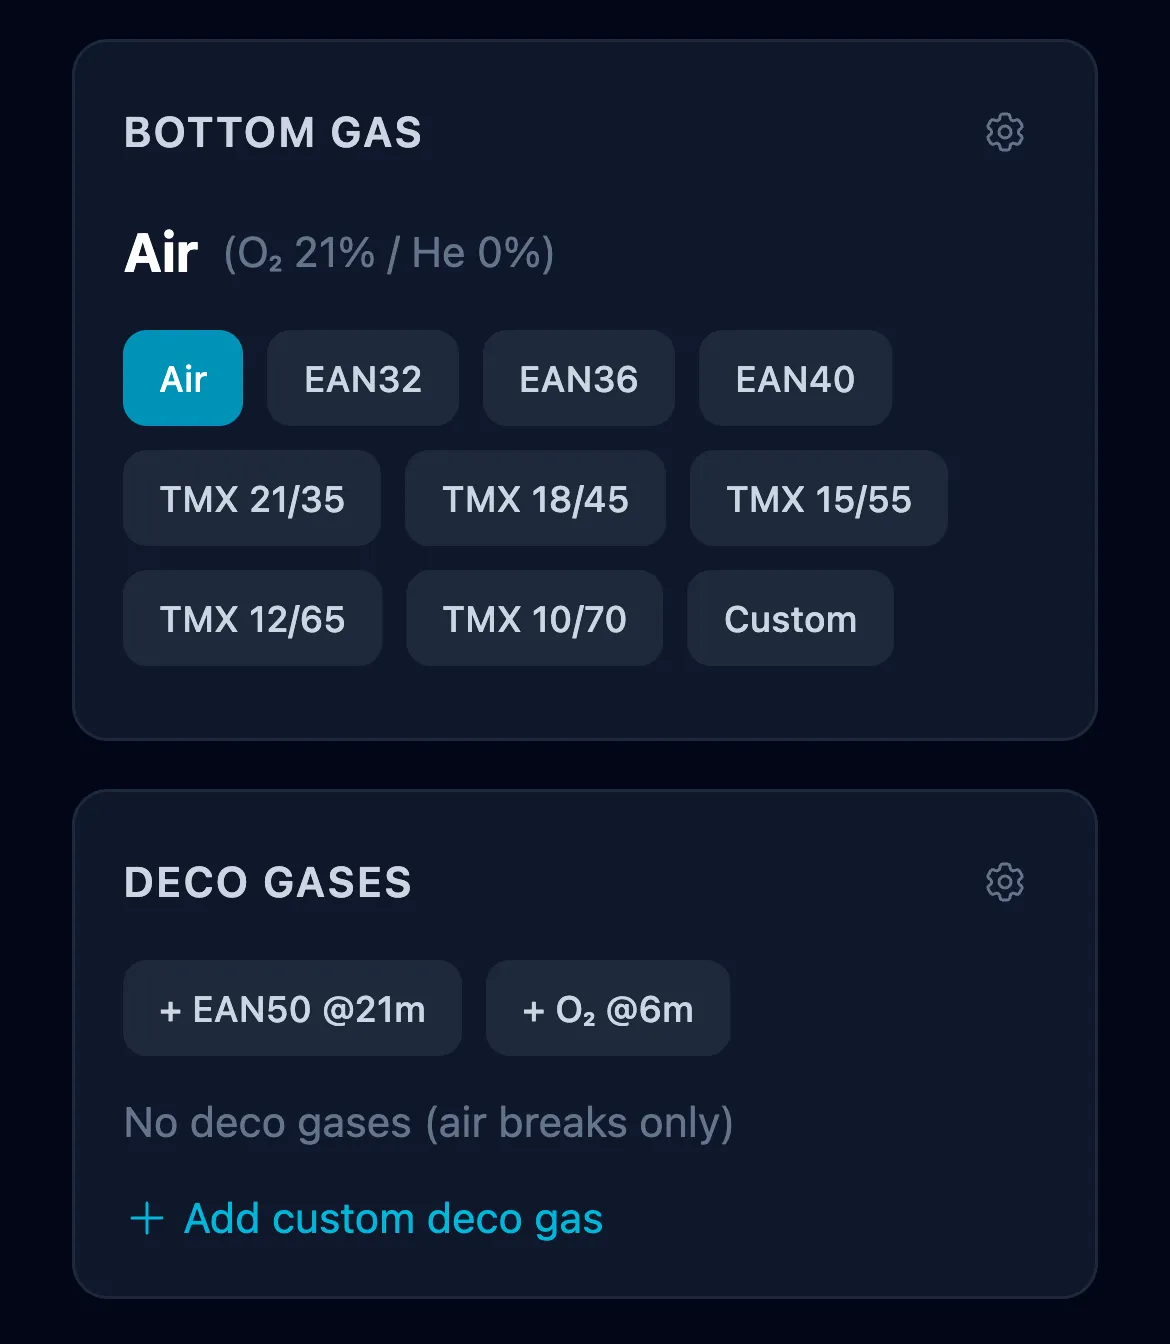
Bottom gas is what you breathe at the deepest segments. Presets cover Air, EAN32, EAN36, EAN40, and the standard trimix range from TMX 21/35 down to TMX 10/70. Tap Add custom in the manage panel to define any O₂/He combination - N₂ is auto-calculated.
Deco gases are optional intermediate or shallow-stop gases. Each gas has a switch depth (in the units you've selected) where the planner will swap to it on ascent, as long as ppO₂ stays under the deco limit (1.6 bar) and density is acceptable. Default presets are EAN50 (switch 21 m) and pure O₂ (switch 6 m), matching typical tech-diving practice.
CCR - Diluent and Bailout
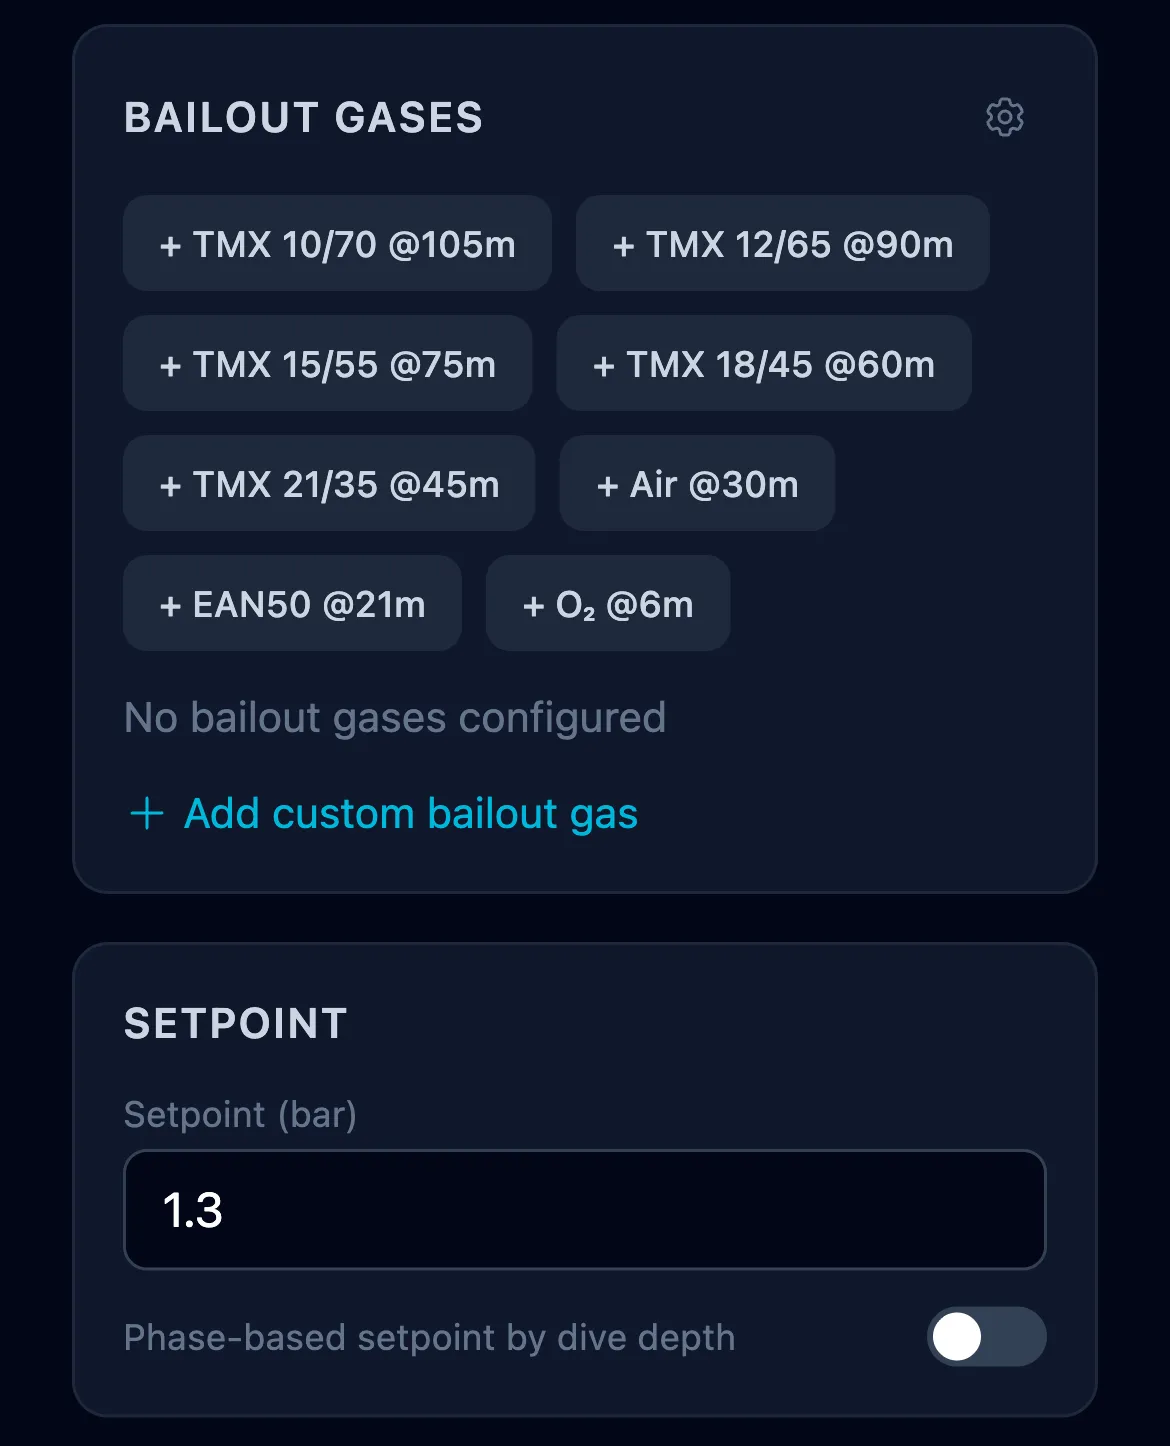
Diluent is the inert carrier gas in the loop. The setpoint (from 2.1) defines the ppO₂; the diluent defines the ppN₂ and ppHe at every depth. The same preset chips and custom-gas flow as OC Bottom gas apply here; the label simply changes from "Bottom Gas" to "Diluent" when CCR mode is active. Choose a diluent with enough helium to keep END manageable and density under 5.2 g/L at your target depth - use the Gas Density calculator (section 3.1) to verify before planning.
Bailout gases appear in runtime only when the Bailout toggle is on. A single bailout gas list covers the whole OC ascent after a loop failure - both the deep phase (your bottom-equivalent trimix) and the shallow deco phase (typically EAN50 and O₂). There is no separate "deco gas" list in CCR mode because the bailout stack already holds the shallow mixes. Presets cover the full trimix range plus EAN50 and O₂, with switch depths pre-set at typical MOD values (TMX 18/45 at 60 m, TMX 15/55 at 75 m, EAN50 at 21 m, O₂ at 6 m) - adjust to your team's standards. The planner picks the richest safe gas at each depth during the bailout ascent and validates each switch against ICD and ppO₂ limits.
2.4 Bailout (CCR only)

The Bailout Plan (OC) toggle sits in the top-right of the Runtime Plan header (a ⚡ switch that turns amber when on) and only appears in CCR mode. Turning it on computes a worst-case scenario: CCR fails at the deepest point and you must ascend on open circuit. The planner schedules the bailout gases you defined (from section 2.3), inserts a Bailout switch stop at the activation depth (see 2.7 Gas Switch), runs ICD checks against the new gas, and reports OC gas consumption alongside the CCR diluent and O₂ numbers. If no bailout gas is configured, a red critical warning prompts you to add one.
On a direct-ascent multi-level or single-level profile, activation happens at the maximum depth. In Same way back (cave) mode - see 2.2 - activation happens at the turn point and the whole return leg runs on OC.
2.5 Runtime Plan & Results
Once inputs are valid, the results area appears below the inputs. Blocks are listed here in the order you see them on screen, top to bottom.
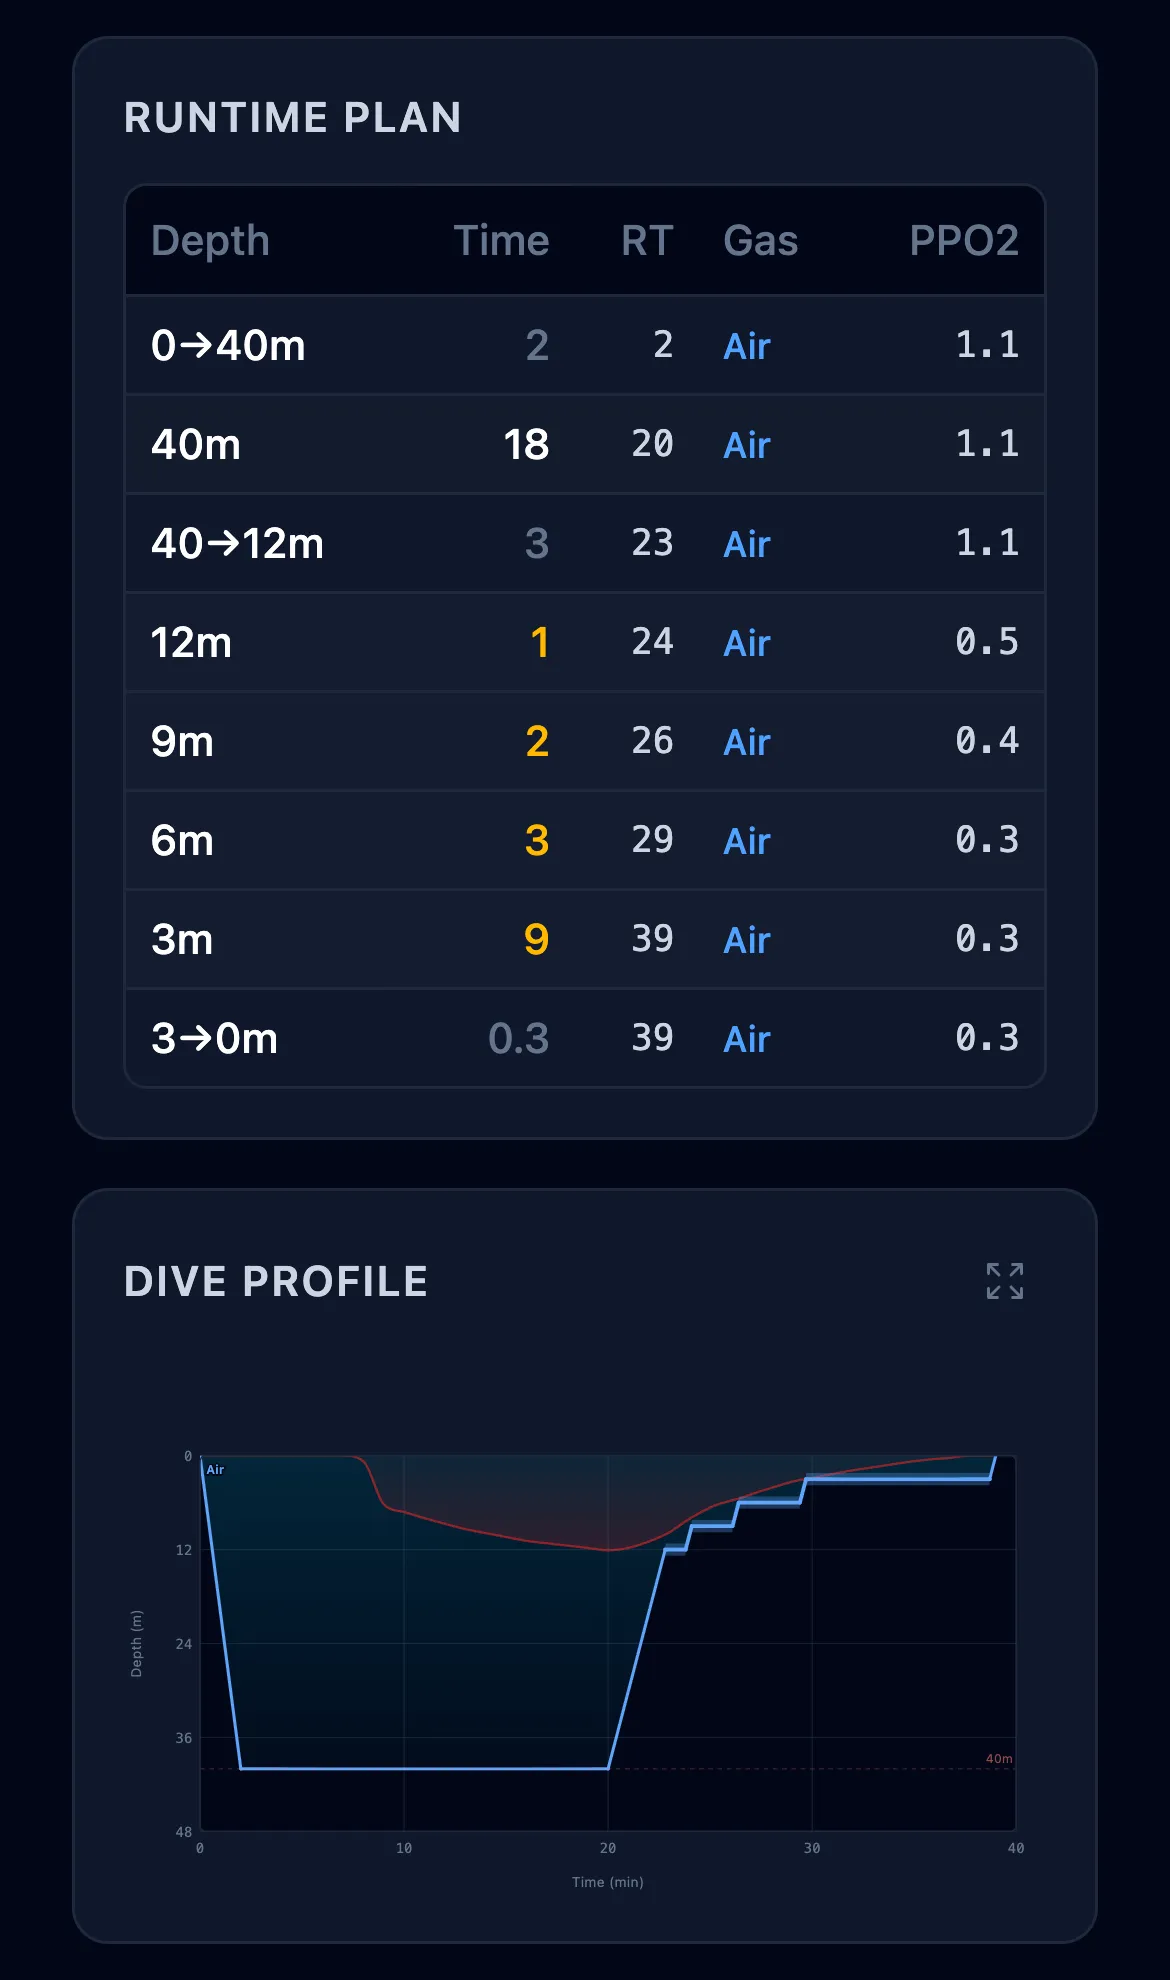
Runtime table
Every phase of the dive, one row per segment or stop. Columns: depth, duration, running clock, active gas, and ppO₂ (or setpoint in CCR mode). Switch rows and ICD alerts are highlighted inline. Colors on the gas column match the gas palette from section 2.3.
No-deco banner & warnings
If the dive is within NDL, a green "No decompression required - NDL dive" banner appears. Otherwise, any warnings generated during the calculation surface here as coloured boxes:
- Critical (rose) - unsafe conditions that would typically abort the plan, e.g. missing bailout gas for a CCR bailout plan, ppO₂ exceeding the deco limit, or a gas too lean to keep you conscious (ppO₂ below 0.16 bar)
- ICD (orange) - a gas switch that raises ppN₂ beyond the configured limit
- Gas density (orange) - any gas exceeds 5.2 g/L caution or 6.2 g/L danger at its use depth
- General warnings (amber) - advisory notes, including gas switch extra-time confirmations and a descending segment whose duration is fully consumed by the descent itself
Where the oxygen check is made. Every row of the plan is checked at both ends of the range oxygen has to sit in, and each row is judged at the point where its own risk is worst: the deepest point of a line for the 1.6 bar ceiling, and the shallowest for the 0.16 bar floor below which a gas will not keep you conscious. That matters because a mix can be fine at a 3 m stop and hypoxic the moment you surface. One exposure produces one line, naming the depth, however many rows share it. A 6 m stop on pure O₂ is not flagged: at 1.61 to 1.63 bar it is the accepted deco ceiling rather than an incident.
The gas density warning follows your altitude setting and is judged per level, on the gas and setpoint actually in force there, reporting the worst value it finds and the depth where it happens. That depth is not always the deepest one - air at 60 m is denser than trimix 10/70 at 100 m.
Dive profile chart
Time on the X axis, depth on the Y axis. Gas colors fill the segments; the ceiling is drawn as a dashed line so you can see visually how close your profile runs to the decompression limit at each moment. Use the Fullscreen button in the top-right corner of the chart to enlarge it to the whole screen - handy on a phone for reading labels on long deco profiles. Turn the phone sideways and it gets bigger again, which is the shape a depth-and-time chart wants. Tap anywhere or press Esc to close.
Hover, or tap and drag, across the chart to reveal a crosshair tooltip. At any point in the dive it reads the depth, running time, active gas with its ppO₂, the ceiling at that moment, the gas consumed so far (shown as a cylinder pressure drop), and the abort-TTS - the time-to-surface if you ended the dive and ascended from that point. Two more numbers sit alongside it:
- Surf GF - the surface gradient factor you would carry if you surfaced from that moment. Below 100 % you are clear; above it you still owe decompression, and the figure tells you how much.
- @+5 - the time-to-surface after holding five more minutes at the cursor depth, and how much that costs you against ascending now. Shearwater-style, and the fastest way to see what "just five more minutes" is really worth at that depth. The delta can be negative on a shallow hold, and is shown as such rather than clipped at zero.
Summary card
Headline numbers at a glance: max depth, total runtime, TTS (time-to-surface - the time from the end of bottom time to reaching the surface), deco stop count, CNS%, OTU. Useful for a quick sanity check before committing to the plan.
Gas Consumption
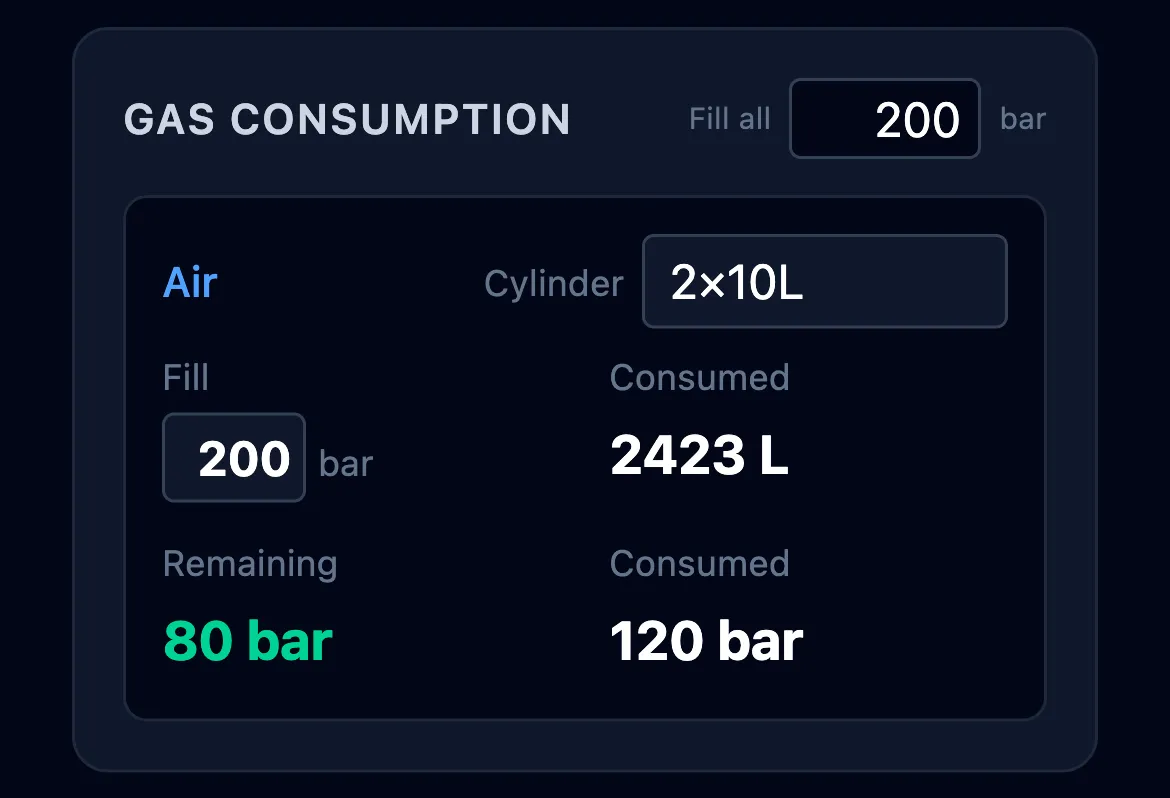
One row per gas actually consumed during the dive. Each row shows total surface-litres, the auto-picked cylinder (smallest that fits with more than 50 bar reserve), required pressure, and remaining reserve. Tap the cylinder dropdown to override the pick for that specific gas - useful when you know you will carry a bigger cylinder for redundancy. Low-reserve rows are amber, over-consumption is rose.
Fill pressure can be set two ways:
- The global "Fill all" input at the top-right of the Gas Consumption card (e.g. Fill all: 200 bar) acts as a bulk setter - changing it snaps every row to the new value and wipes any per-gas overrides you had.
- Each row has its own per-gas input inline between the gas label and the total volume. Change it to fine-tune one cylinder (e.g. "my bailout bottom is filled to 232, everything else is 200") without touching the others.
On CCR dives the panel shows diluent (loop fills on descent) and metabolic O₂ on top of any OC gas used after a bailout - one unified view instead of separate CCR and bailout tables.
Litres become cylinder pressures through a real-gas model, per gas. Gas does not compress the way the textbook formula says, and how far it strays depends on what the gas is: helium squeezes into a cylinder less readily than air, oxygen more readily, so one correction cannot serve both. Each gas gets its own, from the same model the blending tools use. Expect a trimix bailout to need noticeably more pressure than the ideal-gas figure suggests - 2500 litres in an S80 is 237 bar on air but 261 on trimix 10/70 - and an oxygen deco bottle to read slightly more remaining. The volumes themselves follow your water density and altitude settings too. None of this touches your stops, times or runtime; it is the consumption table only.
2.6 Export
Copy as text places a formatted runtime plan on your clipboard, including summary, runtime table, gas consumption, and warnings. Paste straight into a dive log, Slack, or email.
Export PDF builds a one-page A4 plan with the same information plus the profile chart. Useful for a waterproof pre-dive brief or a team copy.
Share PDF appears next to it on phones and tablets, where the device has a share sheet of its own. It builds the same PDF and hands it straight to Messenger, WhatsApp, Mail, AirDrop or Files, so sending a plan to a buddy does not mean downloading it first and then hunting for the file.
An exported plan for the second or later dive of a day carries a line naming the dive number and the surface interval it follows (2.9), so nobody reads it as a plan for a first dive.
If the app updated itself in the background while you had it open, an export can fail; the button then says Reload the page, which is the thing that fixes it. Reloading keeps the dive you were working on.
2.7 Advanced Settings
The Advanced drawer (gear icon in the top-right) holds every parameter that most divers set once and forget. It is organized into five sections separated by rules.
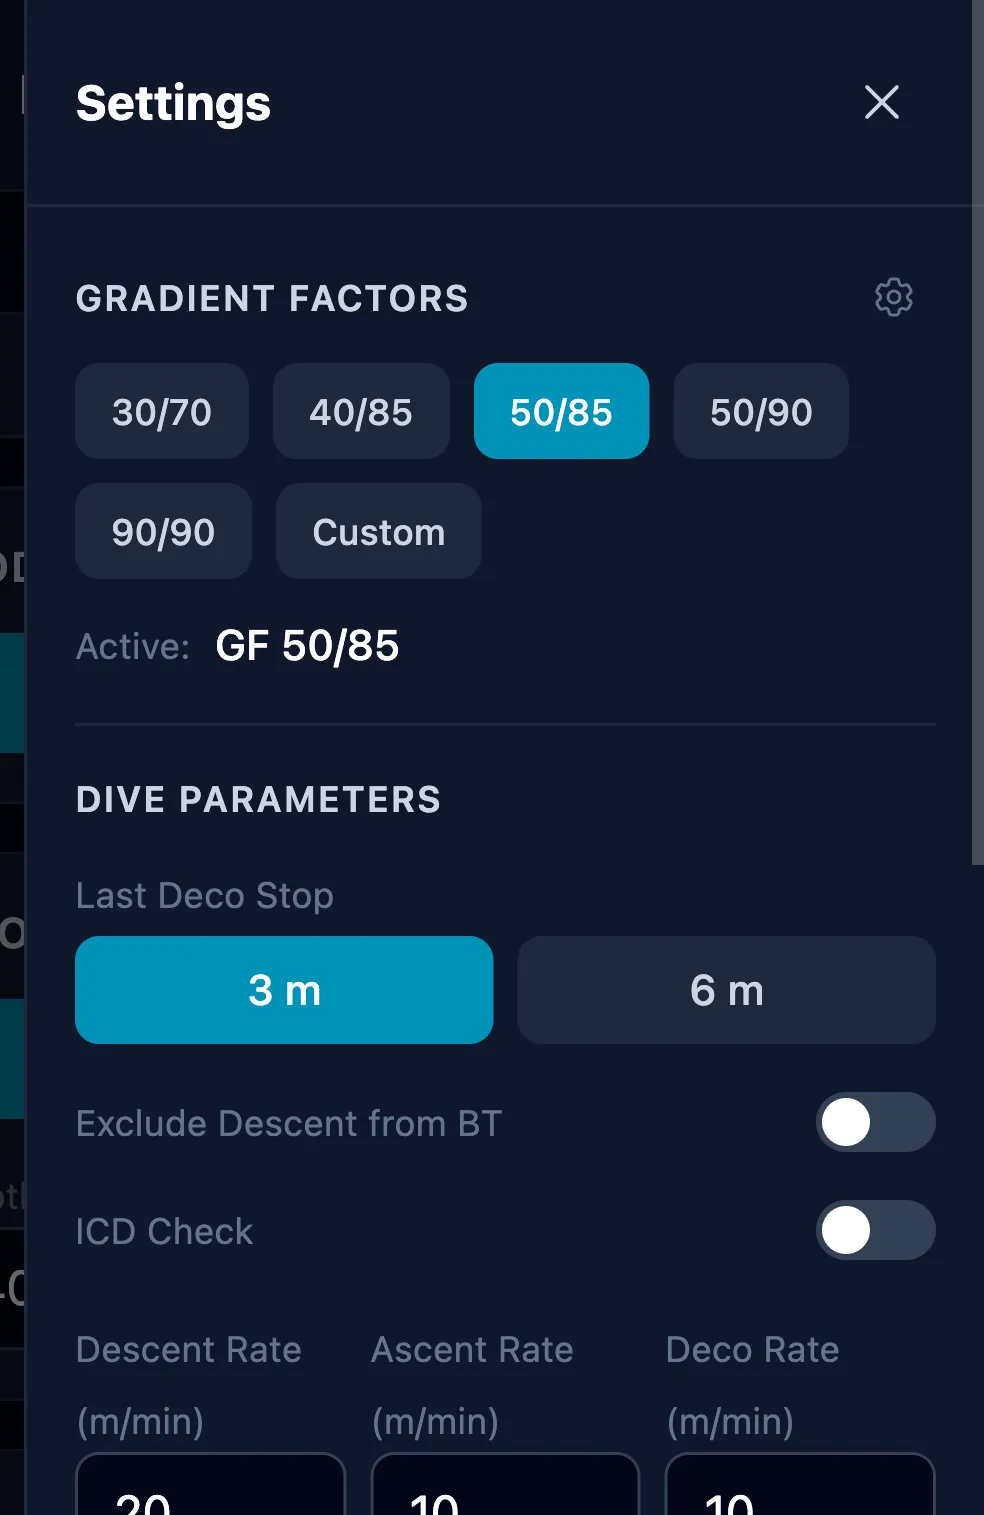
Gradient Factors
Five presets - 30/70, 40/85, 50/85, 50/90, 90/90 - plus a custom pair for any GF Low / GF High combination. Lower values are more conservative (longer deco, deeper first stop). GF Low controls the first stop; GF High controls the surfacing ceiling. The 90/90 preset effectively disables gradient factors and matches pure Bühlmann.
You can also save your own presets: set a custom GF Low / GF High pair and store it as a named chip for one-tap reuse on later plans. Custom GF presets persist across sessions and travel with your Backup & Restore JSON.
Dive Parameters
Last deco stop - 3 m or 6 m. 6 m is common for rough surface conditions or when a 3 m stop is impractical.
The Exclude descent from BT toggle in Dive Parameters decides whether the initial descent time counts toward bottom time. Off by default (descent is included, matching most tables and agencies). Turn it on if you prefer the stricter convention where BT starts only when you reach the first segment's start depth.
ICD Check - Isobaric Counter-Diffusion guard. When enabled, the planner flags any gas switch that raises ppN₂ by more than the limit (default 0.5 ATA) and places the warning on the row where the diver is actually breathing the new gas. Useful for catching bad helium-to-nitrogen transitions that can trigger inner-ear DCS.
Descent rate (default 20 m/min), Ascent rate (default 10 m/min) and Deco rate (default 10 m/min, used between deco stops) - these drive every transit calculation and affect total runtime.
Variable ascent rate - instead of one speed for the whole ascent, slow down as you get shallower, which is what most tech divers actually do. Turn it on and you get four zones with their own rates. The Depth selector decides what the zones are measured against:
- Average or Max - the four zones are defined relative to the dive's average or maximum depth: below 75 %, 75 % to 50 %, 50 % down to the last boundary, and the last stretch to the surface.
- Custom - you set your own depth thresholds and a rate for each, adding and removing zones as needed. The plain Ascent rate above applies below the deepest threshold you defined.
A slower final zone genuinely changes the schedule rather than just the clock: ascending slowly off-gasses, so the planner can shorten the shallow stop accordingly. That is the model behaving correctly, not a rounding artefact.
Display transitions - off by default. When on, the runtime table lists the ascent and descent legs between stops as their own rows instead of folding them into the stops.
Water density - Fresh (1000), EN13319 (1020), or Salt (1025) kg/m³. EN13319 is the European standard for dive computers. Fresh water reduces the pressure gradient per metre of depth, so deco is slightly shallower in real terms.
Altitude (meters above sea level, default 0) - reduces surface pressure, which shifts all ceilings upward. Set this when diving mountain lakes. The drawer shows the computed surface pressure in bar.
Gas Consumption
Bottom / Bailout RMV (Respiratory Minute Volume, surface L/min) - your gas consumption rate on bottom gas, or on bailout gas when CCR mode is active. Default 20.
Deco RMV - typically lower than working RMV because you are resting. Default 15.
CCR Loop volume (default 12 L) - only shown in CCR mode. Drives diluent consumption on descent: every depth change adds loopVolume × Δpressure of diluent. Flushes are not modelled.
CCR O₂ metabolic (default 1.0 L/min) - only shown in CCR mode. Drives metabolic O₂ consumption across the entire dive.
Gas Switch
OC switch (min) - minimum dwell time at the switch depth on the new gas when transitioning between OC gases. Default 0. If you set it to 2 minutes and the existing deco stop at that depth is already 5 minutes, nothing changes. If it is only 30 seconds, the stop is extended to 2 minutes - or a new stop is inserted if none existed.
Bailout switch (min) - same idea, but applied at the moment of switching from CCR to OC. Covers the real-world seconds or minutes it takes to physically deploy a bailout regulator, flush, and begin breathing. Tissue load, CNS, OTU, and ppO₂ are all integrated across the added time.
Auto-switch to best gas in segment - off by default. When on, multi-level OC transits between segments automatically pick the richest available gas at each depth (including deco gases). When off, each segment's declared gas is used literally for the full segment including its transit. Off is the stricter "what I planned is what I breathe" convention.
My Cylinders
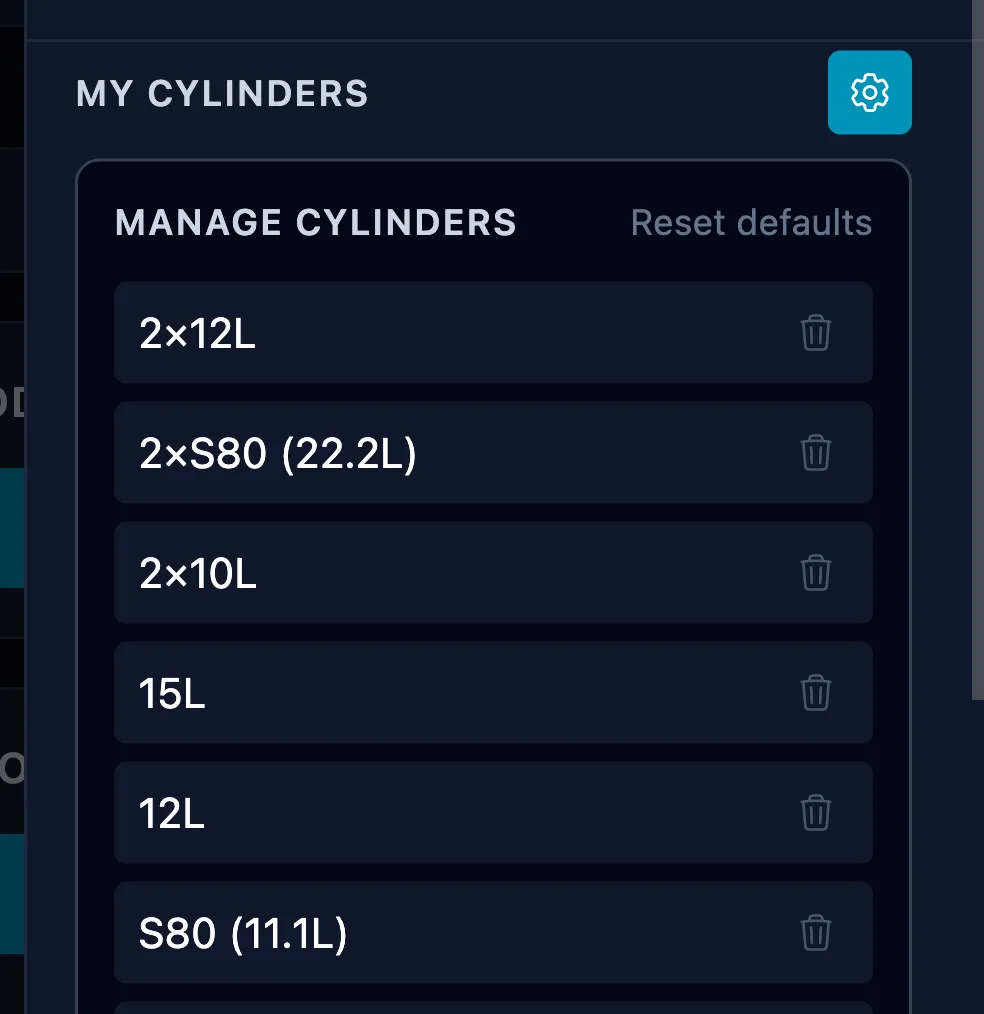
Chip row at the top shows every cylinder available for the auto-picker. Tap a chip to enable or disable a cylinder for this planning session. The gear icon opens a manage panel where you can:
- Hide preset cylinders you never use - they disappear from the chip row until you reset
- Add custom cylinders with any label and water volume (LP85, 18 L twinset, 3 L pony, anything)
- Delete custom cylinders outright
- Reset defaults - brings every preset back and re-enables all of them
Custom cylinders are saved across sessions and travel with your Backup & Restore JSON.
Fill pressure is set directly on the Gas Consumption panel in the main results view (not in the drawer), both as a global default and per individual gas - see section 2.5 for details.
2.8 Saved Plans
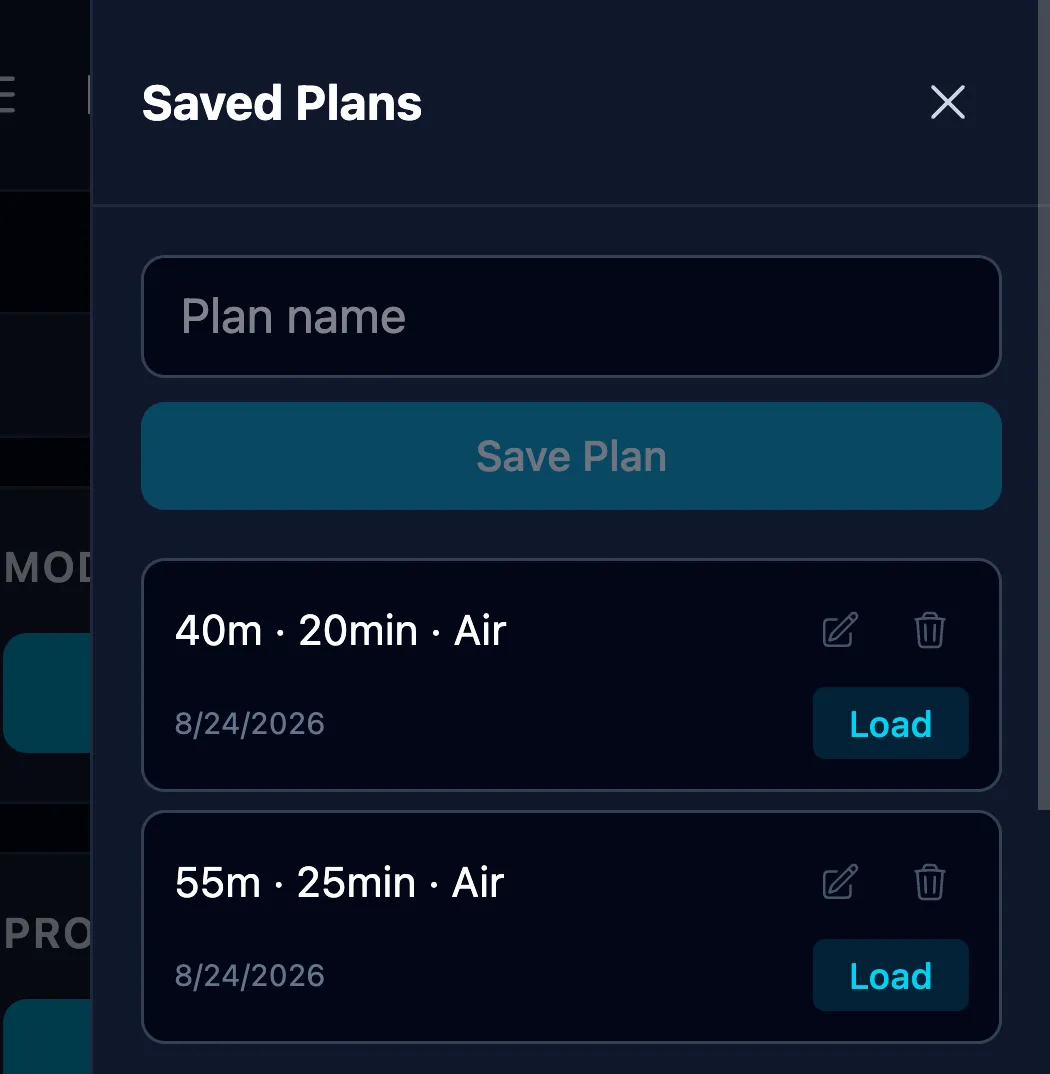
The folder icon in the top-right of the Deco Planner (left of the gear) opens Saved Plans. Type a name, tap Save Plan, and the current dive is stored as a named slot: profile, gases, setpoint, and the advanced settings it was planned with. Saved plans persist across sessions and are included in Backup & Restore (see 1.4), so they move with you to a new device.
Each stored plan offers Load, Rename, and Delete (delete asks for confirmation - it cannot be undone).
What happens when settings do not match. A plan carries the advanced settings it was saved with. If those differ from what you have set now, loading it does not silently change your numbers: a Settings differ dialog lists each field that disagrees side by side, as Current versus Plan, and asks you to choose Use plan settings or Keep current settings (or cancel the load). This matters most for gradient factors, ascent zone rates, and the ICD limit, where loading a plan under the wrong conservatism would quietly produce a different schedule from the one you saved.
2.9 Repetitive dives
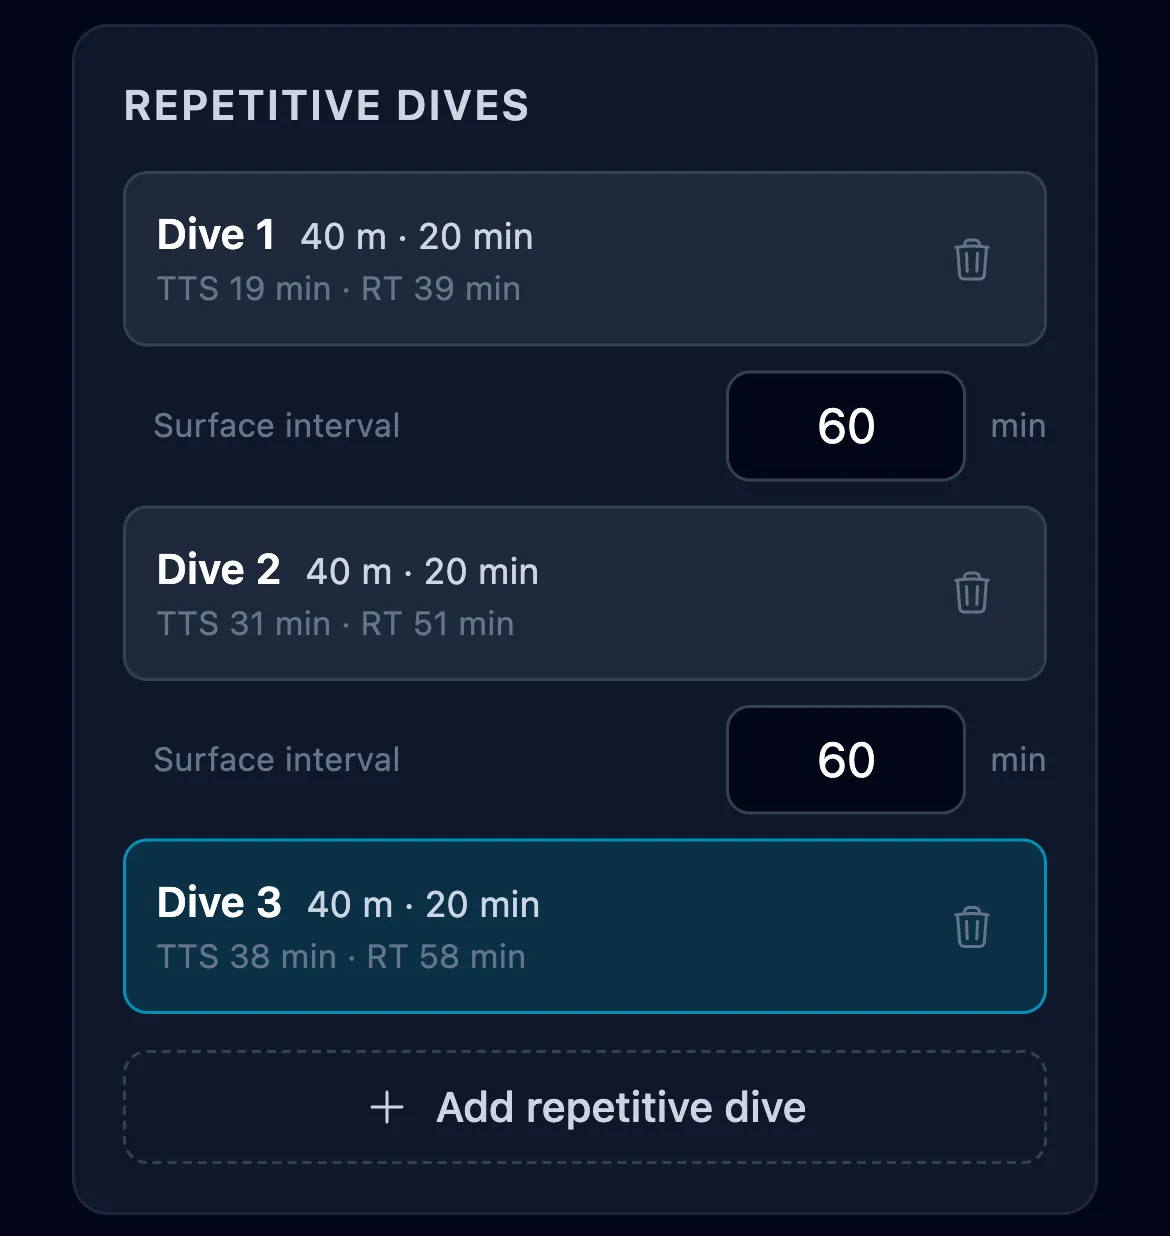
The planner can chain up to four dives in a day - one first dive plus three repetitive ones - so the schedule reflects the whole day rather than treating every dive as a fresh start. Tap Add repetitive dive above the Mode toggle; once a chain exists, a Repetitive dives panel replaces the button and lists every dive with its depth, bottom time, TTS and runtime.
Between each pair of dives sits a surface interval in minutes (default 60, anything from 1 minute to 48 hours). Across that interval the planner off-gasses your tissues, decays CNS, and carries OTU forward as a running daily total. The next dive then starts from that residual loading, so its NDL and deco reflect what is still in you - not a clean slate. A banner above the results names the dive number, the surface interval it follows, the surface gradient factor you start from, and the CNS carried in.
Tap any dive in the list to switch to it; the editor loads that dive and the whole chain recalculates. Every row updates as you type, so you can see immediately what a change to dive 1 does to dive 3. The trash icon removes a dive and re-indexes the rest; deleting until one dive is left collapses the chain back to plain single-dive mode.
If a dive anywhere in the chain cannot be computed - a profile that never surfaces, for example - everything after it is blocked and marked, because a later dive's residual loading would otherwise be built on a dive that never finished.
Advanced settings are shared by the whole chain rather than stored per dive. PDF and copied plans for dive 2 and later carry a header noting the surface interval, so it is clear the schedule assumes residual loading. Saved Plans (2.8) deliberately store only the dive you are editing, as a profile template you can load into any position in a chain.
Note: the working chain is not part of Backup & Restore. It is in-progress state rather than a setting, like the rest of your unsaved screen inputs - it survives closing the app and an update on the same device, but it does not travel to another one. Use Saved Plans for anything you want to keep.
3. Gas tools
Four independent tools, each its own card on the start screen and its own entry in the menu: Gas Density, PP Blend, Top-up and MOD / EAD / END. There is no selector screen to pass through and nothing nested inside anything else.
PP Blend and Top-up are separate tools that share a workbench: the same gas presets, the same prices and the same start temperature, and each keeps what you typed when you switch to the other. So checking a top-up against a fresh blend costs two taps and loses nothing.
3.1 Gas Density
Checks whether a gas mix stays within breathable density limits at depth - the single most underused safety check in technical diving. Dense gas increases work of breathing, CO₂ retention, and narcosis. The widely accepted threshold is 5.2 g/L (caution) and 6.2 g/L (danger), based on Anthony & Mitchell's research.
Mode toggle
The calculator supports both breathing-loop topologies via an [OC | CCR] toggle at the top. Default is CCR.
- CCR - loop gas composition is driven by the setpoint (the solenoid holds ppO₂ constant). Density depends on setpoint, diluent, depth, and temperature.
- OC - the breathing gas at depth is the cylinder mix as-is. No setpoint input.
Inputs
Gas presets (label changes to "Diluent Presets" in CCR mode) - six chips: Air plus five trimixes (TMX 21/35, 18/45, 15/55, 12/65, 10/70). Tap a chip to load its O₂/He composition; N₂ auto-fills. You can still override O₂ and He manually after picking a preset - the chip will de-select and the inputs become custom.
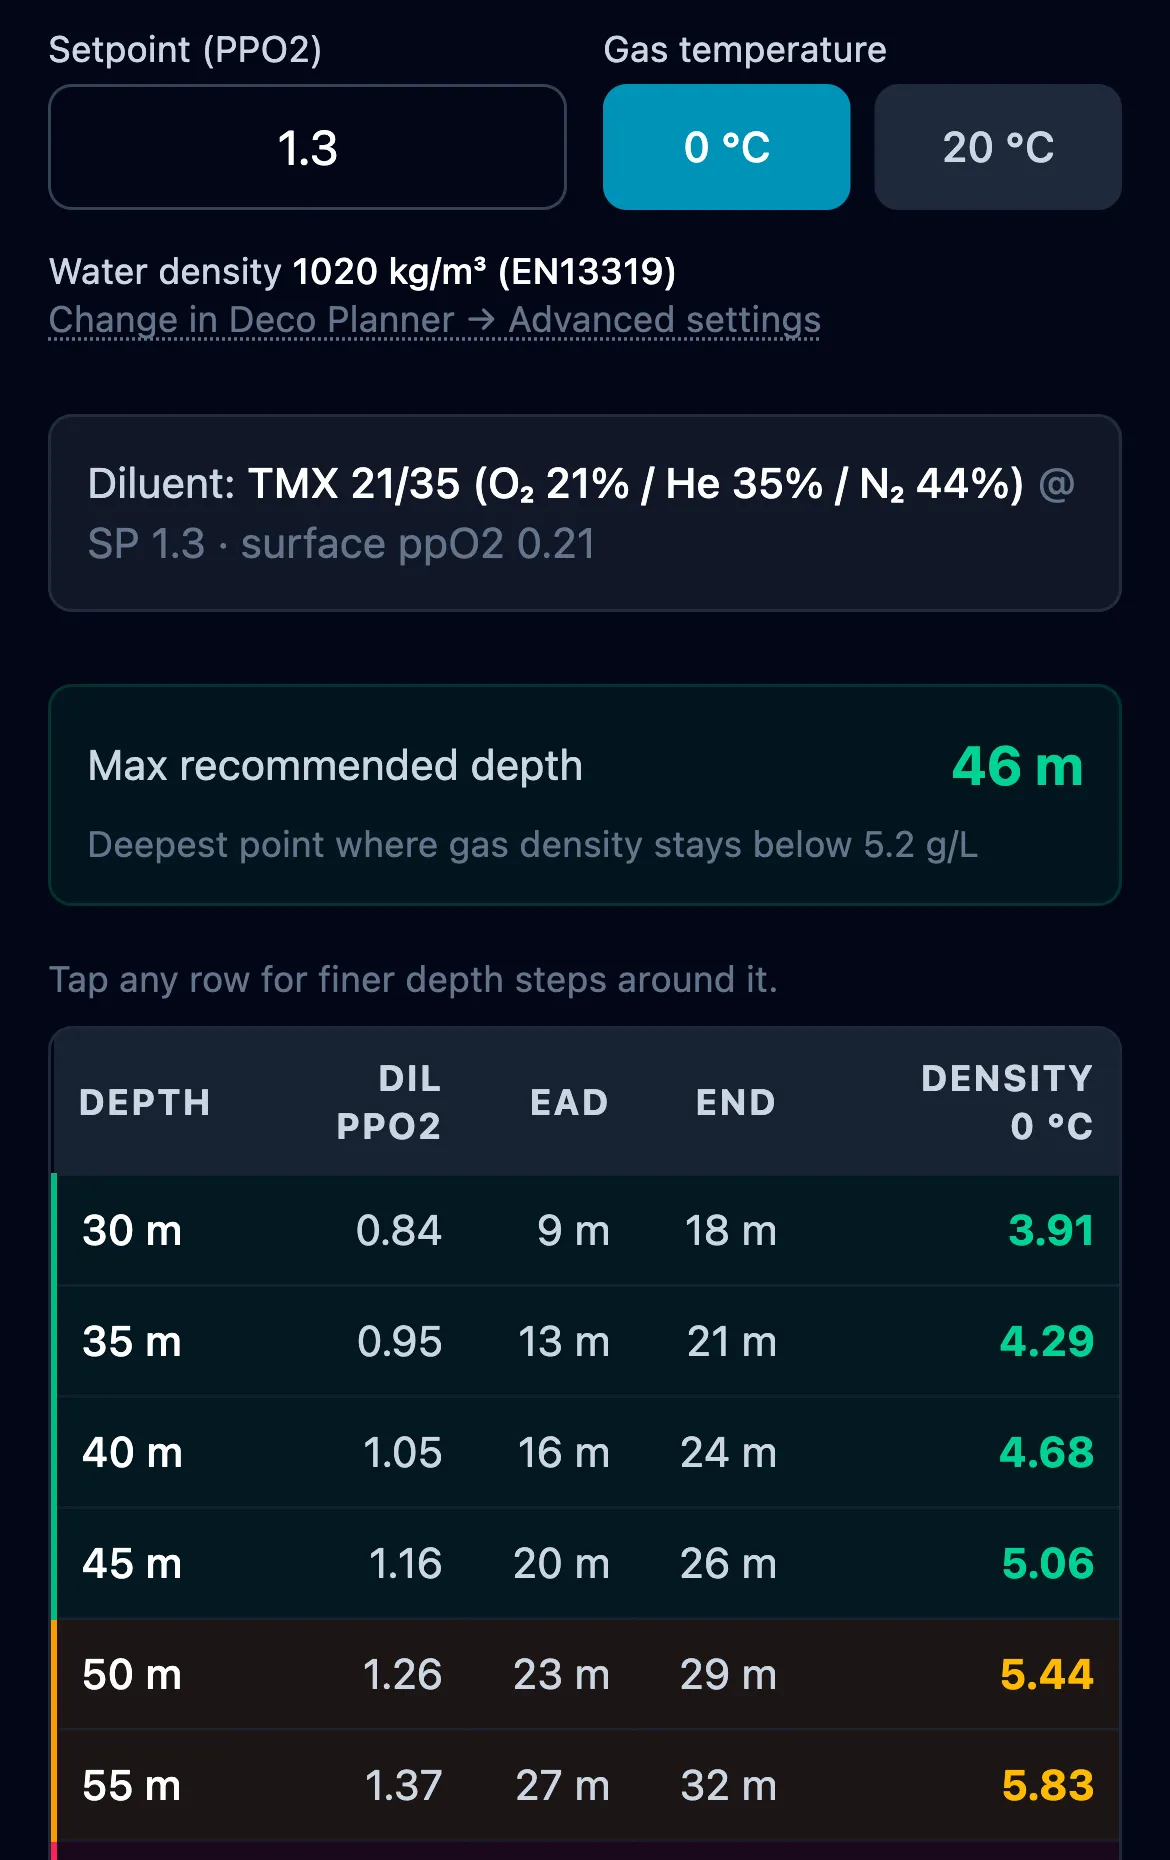
Setpoint (PPO₂) - CCR mode only. The partial pressure of O₂ the rebreather holds in the loop. Default 1.3 bar, accepted range 0.4 to 1.8 - wider than the planner's, because this screen is for checking a gas rather than planning a dive, so it has to cover a low descent setpoint and a deliberate what-if. A higher setpoint means more O₂ in the loop and correspondingly less inert gas, and it still raises density, because oxygen is denser than the helium-rich remainder it displaces: TMX 21/35 at 30 m reads 3.33 g/L at setpoint 0.4, 3.91 at 1.3, and 4.23 at 1.8. Hidden in OC mode.
Gas temperature - a [0 °C | 20 °C] toggle for the conditions the density column is expressed in. 0 °C is the convention Anthony & Mitchell's limits were published in; 20 °C is closer to gas warmed by the airway and is the frame MultiDeco offers. The colour rating and the max recommended depth both follow whichever you pick, so switching to 20 °C moves the limit deeper - the same gas is about 7 % less dense once warmed. The note under the table always names the frame in use.
Hypoxic diluent warning. If the mix you entered cannot be breathed at the surface - ppO₂ below 0.16 bar - the screen says so next to the inputs before you even look at the table. TMX 10/70, for instance, is flagged straight away at a surface ppO₂ of 0.10.
Water density - not an input on this screen. It is read from Deco Planner → Advanced settings so the two screens cannot disagree, and shown as a line below the inputs; tap it to jump straight to where it is set.
Outputs
In CCR mode:
- Max recommended depth - the deepest point where computed density stays below 5.2 g/L for this diluent + setpoint, evaluated at the temperature the table is set to - switching from 0 °C to 20 °C moves it deeper, because the same gas is about 7 % less dense when warm. If density exceeds 5.2 g/L at the surface already, the output reads "N/A - density too high at surface".
- Finer depth steps on demand - tap any row to expand the range around it. Tapping 45 m opens 40 to 50 m in one-metre steps, so you can see exactly where a mix crosses a limit instead of reading between two rows. Deeper down the steps widen to match the table (2 m above 100 m, 5 m above 150 m), so you always get the same eleven rows. Tap again to close, or tap a row elsewhere to move the detail there. The expansion survives changes to the mix, the mode and the temperature, so you can hold a depth range still and tune the gas until it crosses.
- Density table - one row per depth step. Columns: Depth, DIL ppO₂ (the diluent's own, not the loop's - the loop sits at the setpoint on every row, so a loop column would be a constant; this is what tells you whether the diluent is breathable there, for a dil flush or a bailout), EAD and END (of the loop gas, so they match the density column), and Density. Rows are color-coded: safe (green, < 5.2), caution (amber, 5.2-6.2), danger (rose, > 6.2), with a legend below the table.
In OC mode the output is a plain, monochrome density table with no max-depth recommendation, no row colors, and no legend - purely informational. Depth limits for OC are set by MOD and ppO₂, not density, so that is where the recommendation belongs (see 3.4). The table still lets you see at a glance how density grows with depth on any mix.
Why this matters - especially for CCR. At 45 m on a rebreather with Air diluent (setpoint 1.3, EN13319 water, 0 °C) the loop density is 7.04 g/L - past the 6.2 g/L danger threshold. Switch to TMX 21/35 diluent at the same depth and setpoint, and density drops to 5.06 g/L - back under the 5.2 g/L recommended limit. Check here before you plan.
3.2 PP Blend
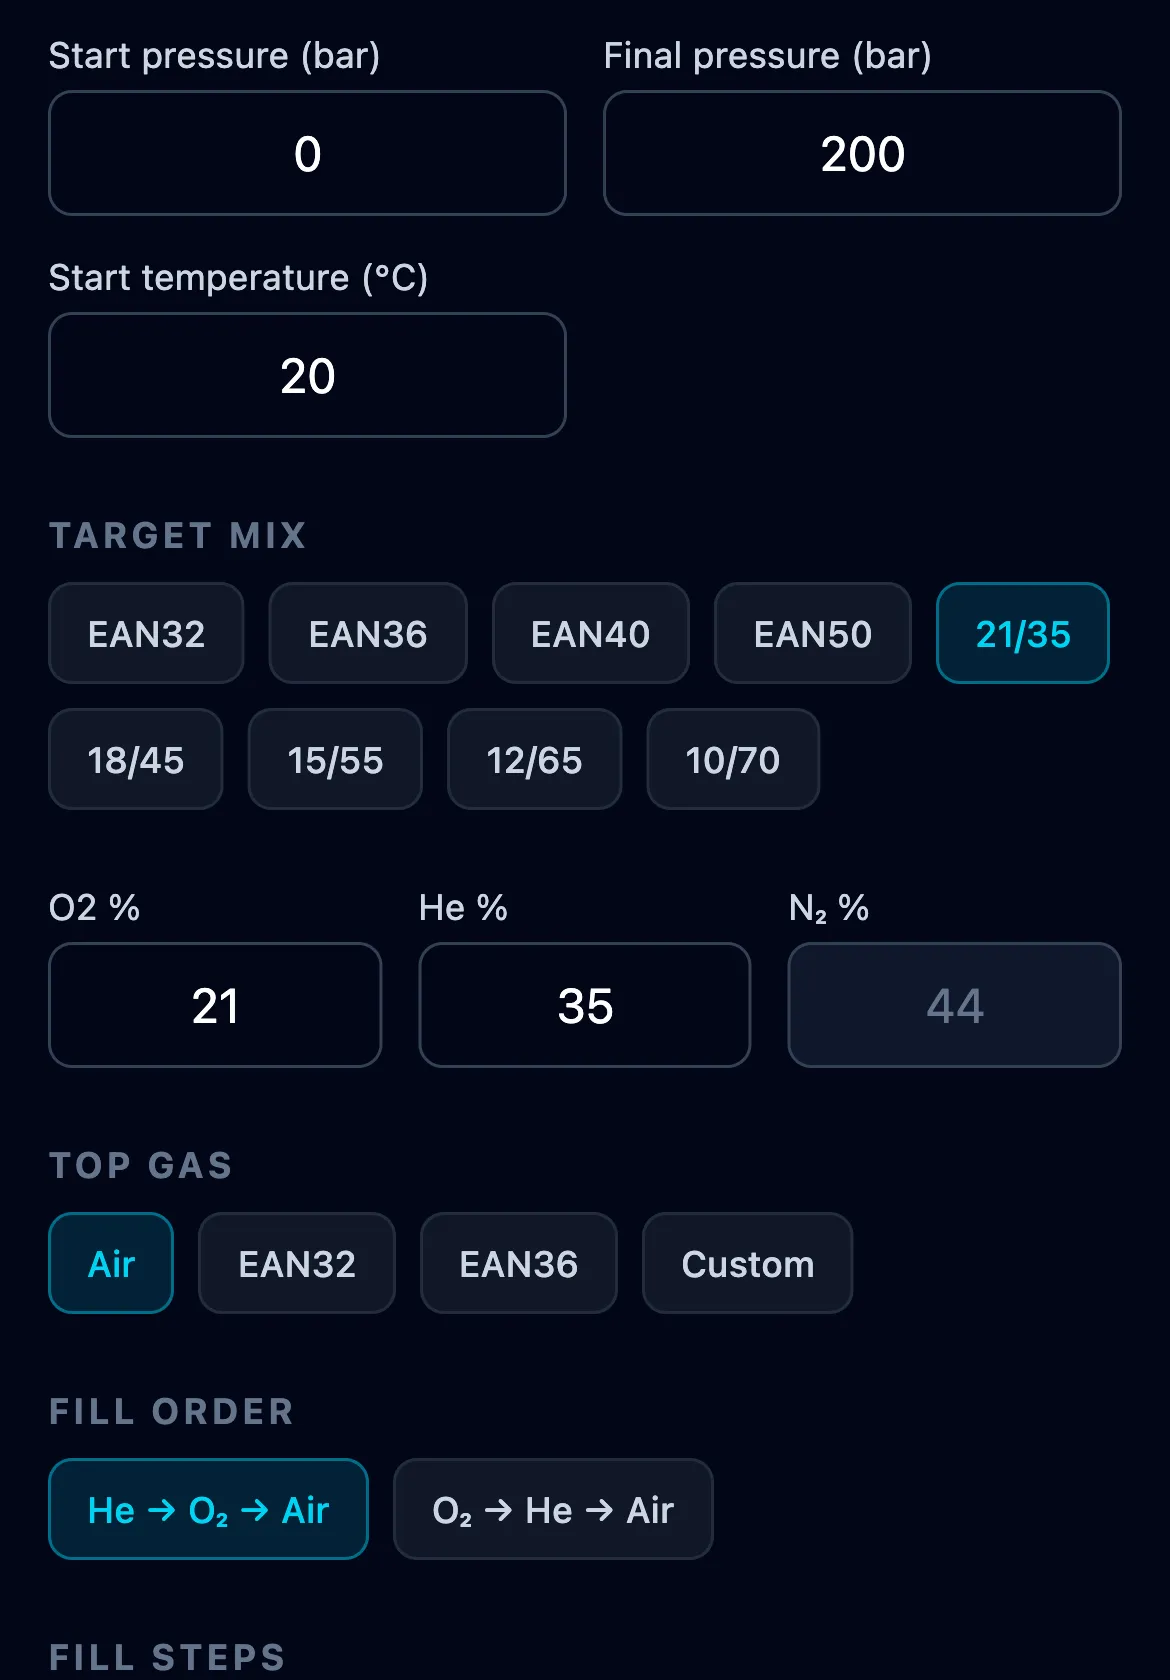
Calculates a partial-pressure blend recipe when you want a specific target mix at a specific final pressure, mixing from an empty or near-empty cylinder.
- Start pressure - what is in the cylinder now, usually left over from a previous dive. Zero for a truly empty one.
- Final pressure - target fill pressure (default 200 bar).
- Start temperature - see below; it belongs next to the pressures because it is what says how much gas those pressures represent.
- Residual gas - O₂% / He% / N₂% currently in the cylinder. The block appears only once the start pressure is above zero, since an empty cylinder has no composition to declare.
- Target mix - the O₂% / He% / N₂% you want to end up with.
- Top gas - what the last top-off is done with: Air (21/0), EAN32, EAN36, or a custom mix.
- Fill order -
He → O₂ → ToporO₂ → He → Top, where Top is whatever Top gas you selected. The labels in the app read "Air" as shorthand for the last step regardless of the actual gas. Most blenders prefer helium first to minimise O₂ exposure in helium lines; pick the order your blending station supports.
Results show the pressure to stop at after each gas, plus a cost estimate if you filled in prices (see below).
Over-rich or over-filled cylinders. If the cylinder already holds too much O₂ or He for your target - or is filled above the final pressure - a straight partial-pressure fill is impossible. The planner then computes how far to vent first and returns a complete procedure with a leading Vent step followed by the normal fill sequence. Helium can only be removed by venting, so a trimix-to-nitrox change vents the cylinder fully. If venting alone still cannot reach the target (e.g. a target leaner in O₂ than what is already in the cylinder), the planner tells you instead of returning a dead end.
Start temperature
Gas is compressible, and how compressible depends on temperature - so the pressure a given amount of gas shows depends on how warm the cylinder is. Start temperature (default 20 °C, °F in imperial) is the temperature the cylinder is at when it is at rest: before you start, and again once it has cooled down afterwards. It is what tells the planner how much gas your start pressure actually represents, and it fine-tunes every pressure in the recipe. It sits directly under the start pressure rather than in a settings panel, and it is shared with Top-up.
Every plan repeats the practical consequence: filling warms the cylinder and it loses pressure as it cools, so fill slowly, let it cool, top up, and always analyse the final mix.
Gas warming: what the gauge should read while you fill
A cylinder gets hot while you fill it, and warm gas shows a higher pressure than the same gas will show once it has cooled. Filling to the planned number on a hot cylinder therefore leaves you short: a trimix 21/35 planned to 200 bar settles at around 183 if you stop at 200 while it is at 40 °C, and the air you then add to make up the difference leaves you with less helium than you planned for.
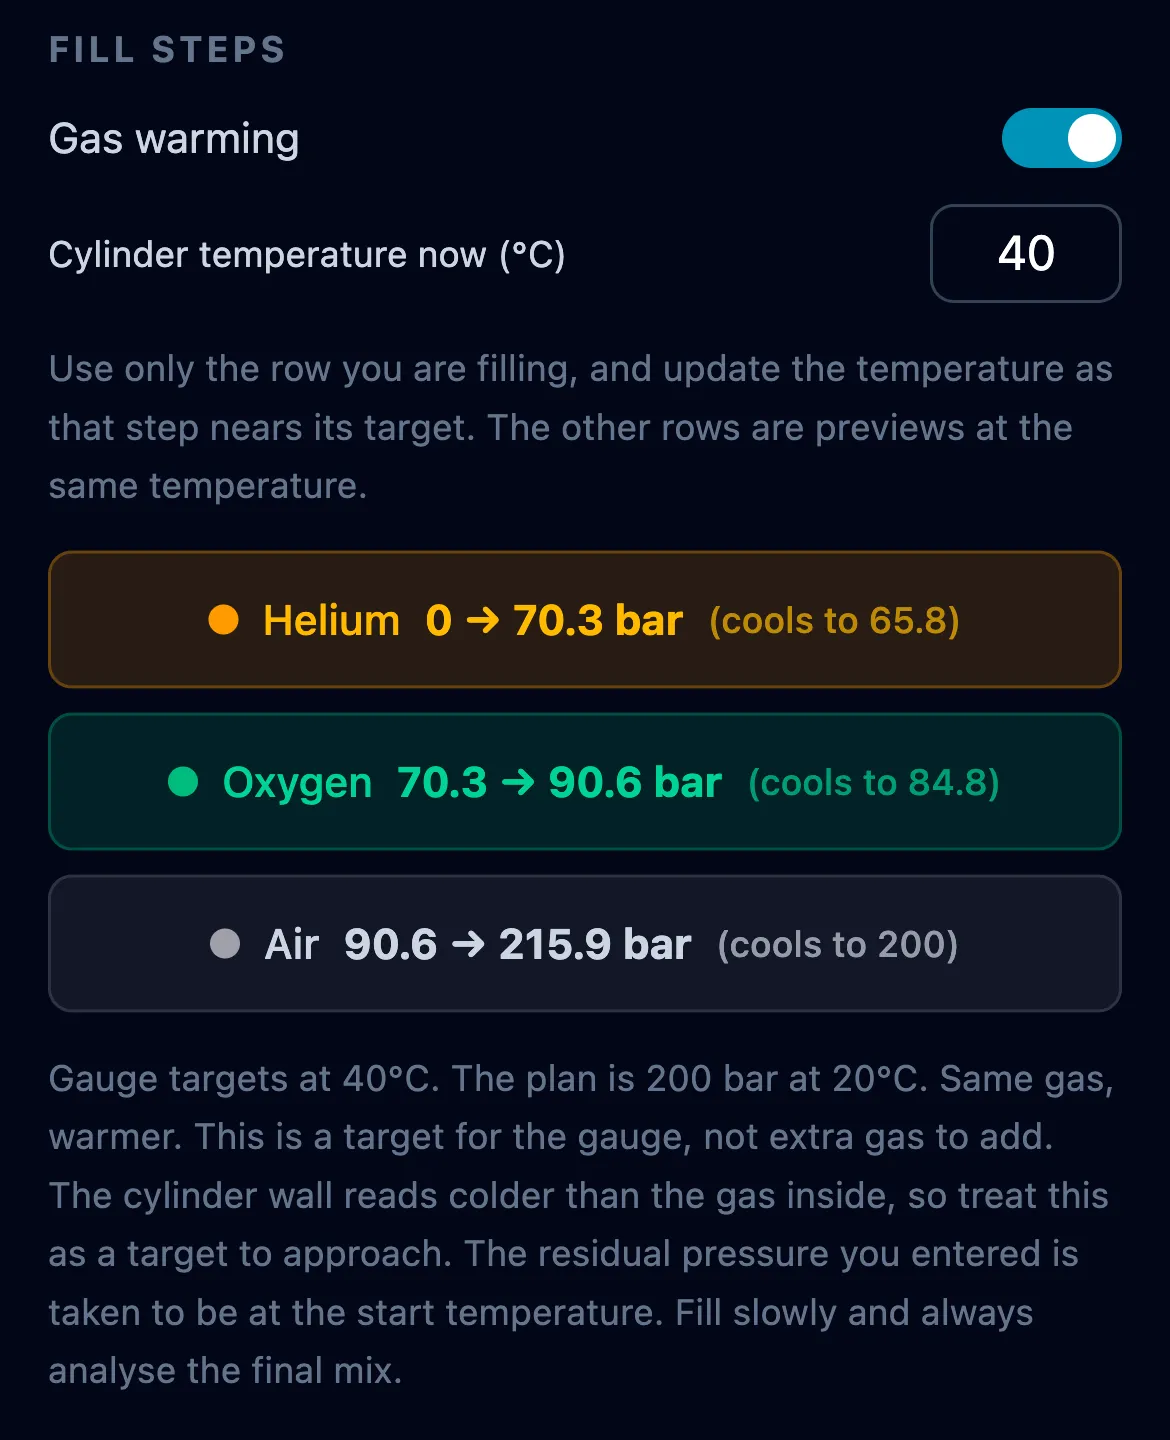
Switch on Gas warming above the fill steps and enter Cylinder temperature now. Every step pressure is rewritten as the number to fill to at that temperature - the 21/35 above wants 216 bar on the gauge at 40 °C. That is not extra gas: as the cylinder cools it settles back to the 200 you planned. The blend itself is never re-solved, because "200 bar" is a promise about the cylinder at rest; only the displayed targets move.
The switch stays where you left it, including after you close the app, because whether you fill warm cylinders is a fact about you rather than about one fill. The temperature does not: it is a reading off a thermometer, so restoring yesterday's would describe a cylinder that is no longer in front of you. Reopen the app and the switch is still on with the field back at your start temperature, waiting for the reading. Within a session the reading is kept through everything else - switching the view off and on to compare, editing a pressure, copying a result into the next stage, or leaving for another tool and coming back.
PP Blend and Top-up keep their own switch and their own reading, so turning it on in one does not change the other. What the two still share is the workbench rather than the fill: the presets, the prices and the start temperature.
- Every row says where it lands. Next to each warm target is the pressure it settles at once the cylinder cools, so the number you fill to and the number you planned are side by side. That is also how you spot a temperature you forgot to update: if the rows are annotated, the app thinks the cylinder is warm.
- One row at a time, on a fill with several steps. The cylinder is not equally warm through the whole fill, so a single temperature cannot be right for every step. Update the value as each step gets close to its target, and the row you are filling is the one to trust. The others are for reference. A Top-up is a single fill, so this does not arise there.
- A target to approach, not a figure to trust to a tenth of a bar. A thermometer on the outside of a cylinder reads colder than the gas inside it. Let the cylinder settle before the final pressure check, and analyse the mix.
- The per-step gas amount (the +X bar next to each row) disappears while warming is on. The amount of gas does not change with temperature, and printing it beside re-read pressures would produce a number that agrees with neither.
- A Vent step is left alone. Venting is not a fill, so its pressure is not a target to hit.
Preset management
The gear-style Manage Presets button exposes the preset library for quick-selecting target or fill gases. Add custom presets, remove ones you never use, or reset to defaults. The library is shared with Top-up.
Cost estimate
Optional block at the bottom. Enter prices per litre (per cubic foot in imperial units) for He, O₂, Air, EAN32, EAN36, and a custom gas, plus your cylinder size. A currency field (free text) lets you label the total in your own currency. The planner multiplies volumes of each gas used in the fill by its price and gives a total. Useful for shop runs and trip budgeting. Prices are remembered across sessions and shared with Top-up.
The cylinder size field stays in litres in both unit systems, because it is the volume of water a cylinder holds and there is no sensible cubic-foot figure for it: the familiar 80 of an AL80 is a gas capacity, not a size. Pick your tank by name from the buttons above that field.
3.3 Top-up
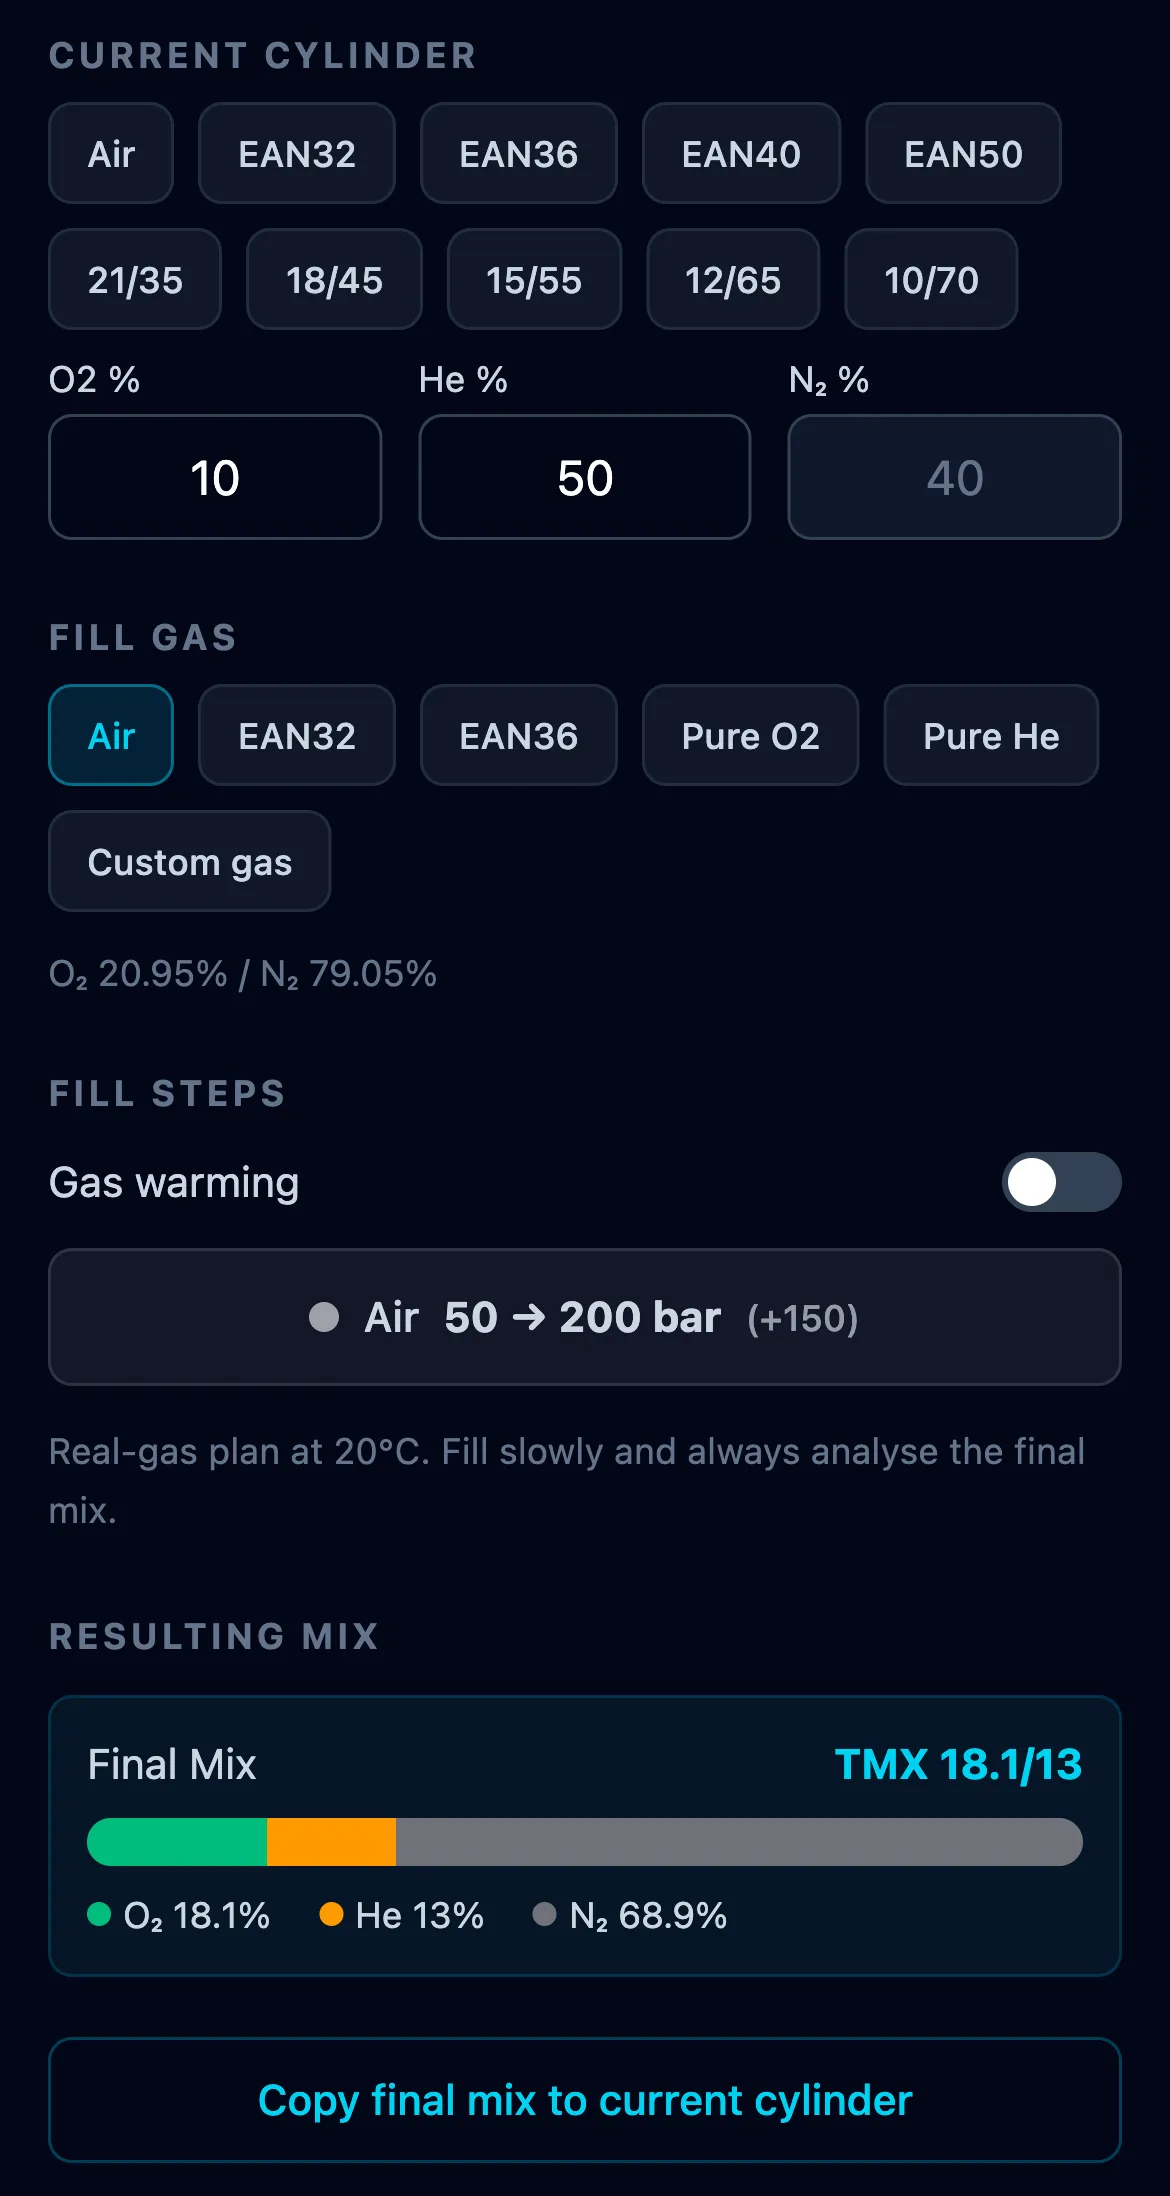
You already have gas in the cylinder and want to fill to a target pressure with one specific gas. Top-up computes the resulting mix and warns if it becomes unusable. It is laid out like PP Blend and behaves like it, because it is the same job with the target at the other end: there you name the mix and it tells you the pressures, here you name the gas and it tells you the mix.
- Start pressure, Final pressure and Start temperature - the same three fields in the same place as PP Blend.
- Current cylinder - the O₂% and He% already in it. The nitrogen is worked out for you and shown.
- Fill gas - Air, EAN32, EAN36, pure O₂, pure He, or a custom gas.
The fill is listed as a step, like any other fill, so it gets the same gas warming toggle: if the cylinder is warm, the app will tell you what the gauge should read. Presets, prices and the start temperature are shared with PP Blend, and the cost estimate works the same way.
Results: the resulting mix (O₂% / He% / N₂%) with a composition bar, plus any safety warnings - "O₂ > 40% - high oxygen, analyze before use", "O₂ < 18% - travel gas or deep mix only", "O₂ < 16% - hypoxic, not breathable at surface".
Filling in stages
A trimix fill is usually a sequence rather than a single top-up: helium first, then oxygen, then air, each one its own fill of the same cylinder. Top-up plans one fill, so a fill in three stages is three of them, where each stage starts from what the previous one left in the cylinder.
Copy final mix to current cylinder, under the result, is what carries you from one stage to the next. It puts the mix you just worked out into the Current Cylinder boxes and sets the start pressure to the pressure you just filled to. Pick the next gas, type the next target pressure, and the next stage is planned.
Until you type that pressure the app says the fill pressure has to be greater than the current one, because for a moment the two are the same. That is not an error in what you did, it is the next stage waiting to be told where it ends.
The cost estimate prices one stage, not the whole fill. It always describes the fill currently on screen, so it changes to the new stage the moment you copy the result across, and the figure for the stage you just finished is gone. A three-stage fill therefore gives you three figures to add up yourself, not one total. Note each one down as you go if the total is what you are after.
What does not carry over is temperature. Start temperature keeps describing the cylinder at rest, and gas warming starts fresh for each stage. That is deliberate: a cylinder is at its warmest at the end of a fill, so the temperature that mattered for the stage you just finished is not the one to plan the next stage with. Let it settle, read it again, and analyse the mix between stages - the app copies numbers, not the analysis.
3.4 MOD / EAD / END
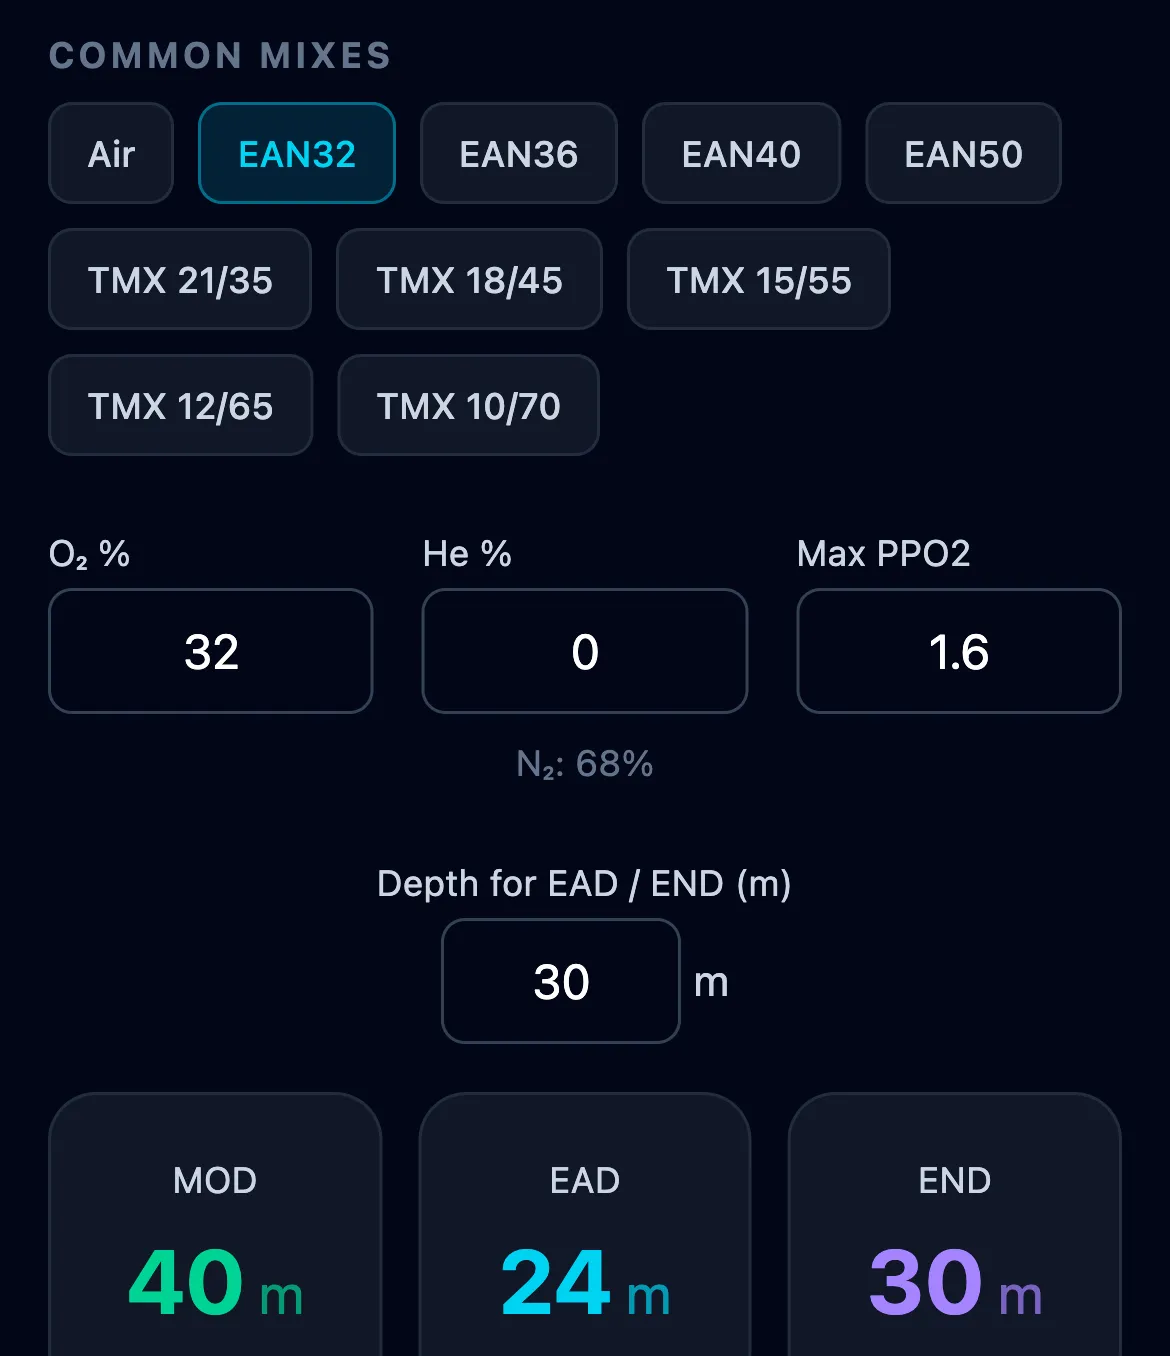
Three classic single-value calculations for any nitrox or trimix, all on one screen.
- MOD (Maximum Operating Depth) - deepest depth where ppO₂ stays below your set limit. Driven by O₂ fraction and max ppO₂ only.
- EAD (Equivalent Air Depth) - the air depth with the same ppN₂ as your nitrox at the reference depth. Used to pick a conservative no-stop table row when diving nitrox.
- END (Equivalent Narcotic Depth) - the air depth with the same narcotic potential (He treated as non-narcotic) as your trimix at the reference depth.
Inputs
Common mixes - ten chips: Air, EAN32, EAN36, EAN40, EAN50, plus trimixes TMX 21/35 through 10/70. Tap to load; manual O₂/He override is allowed.
Max PPO₂ - default 1.6 bar (common working limit). Use 1.4 for conservative planning, 1.0 for rebreather resting setpoints, or your agency's number.
Depth - the reference depth for EAD and END. MOD ignores this input (it's depth-independent). Default 30 m.
Outputs
Three large numbers - MOD, EAD, END - each in metres or feet depending on your units. For trimix, MOD and EAD diverge: MOD is driven by O₂, EAD only by N₂. END includes only helium as the narcosis reducer (O₂ is treated as narcotic, matching GUE/TDI convention).
4. Checklists
Step-by-step pre-dive safety checklists with phase navigation, progress tracking, per-step timers, and a dive log. Custom checklists can be created, edited, duplicated, and deleted; default ones can be reset back to their shipped state at any time.
4.1 Default checklists
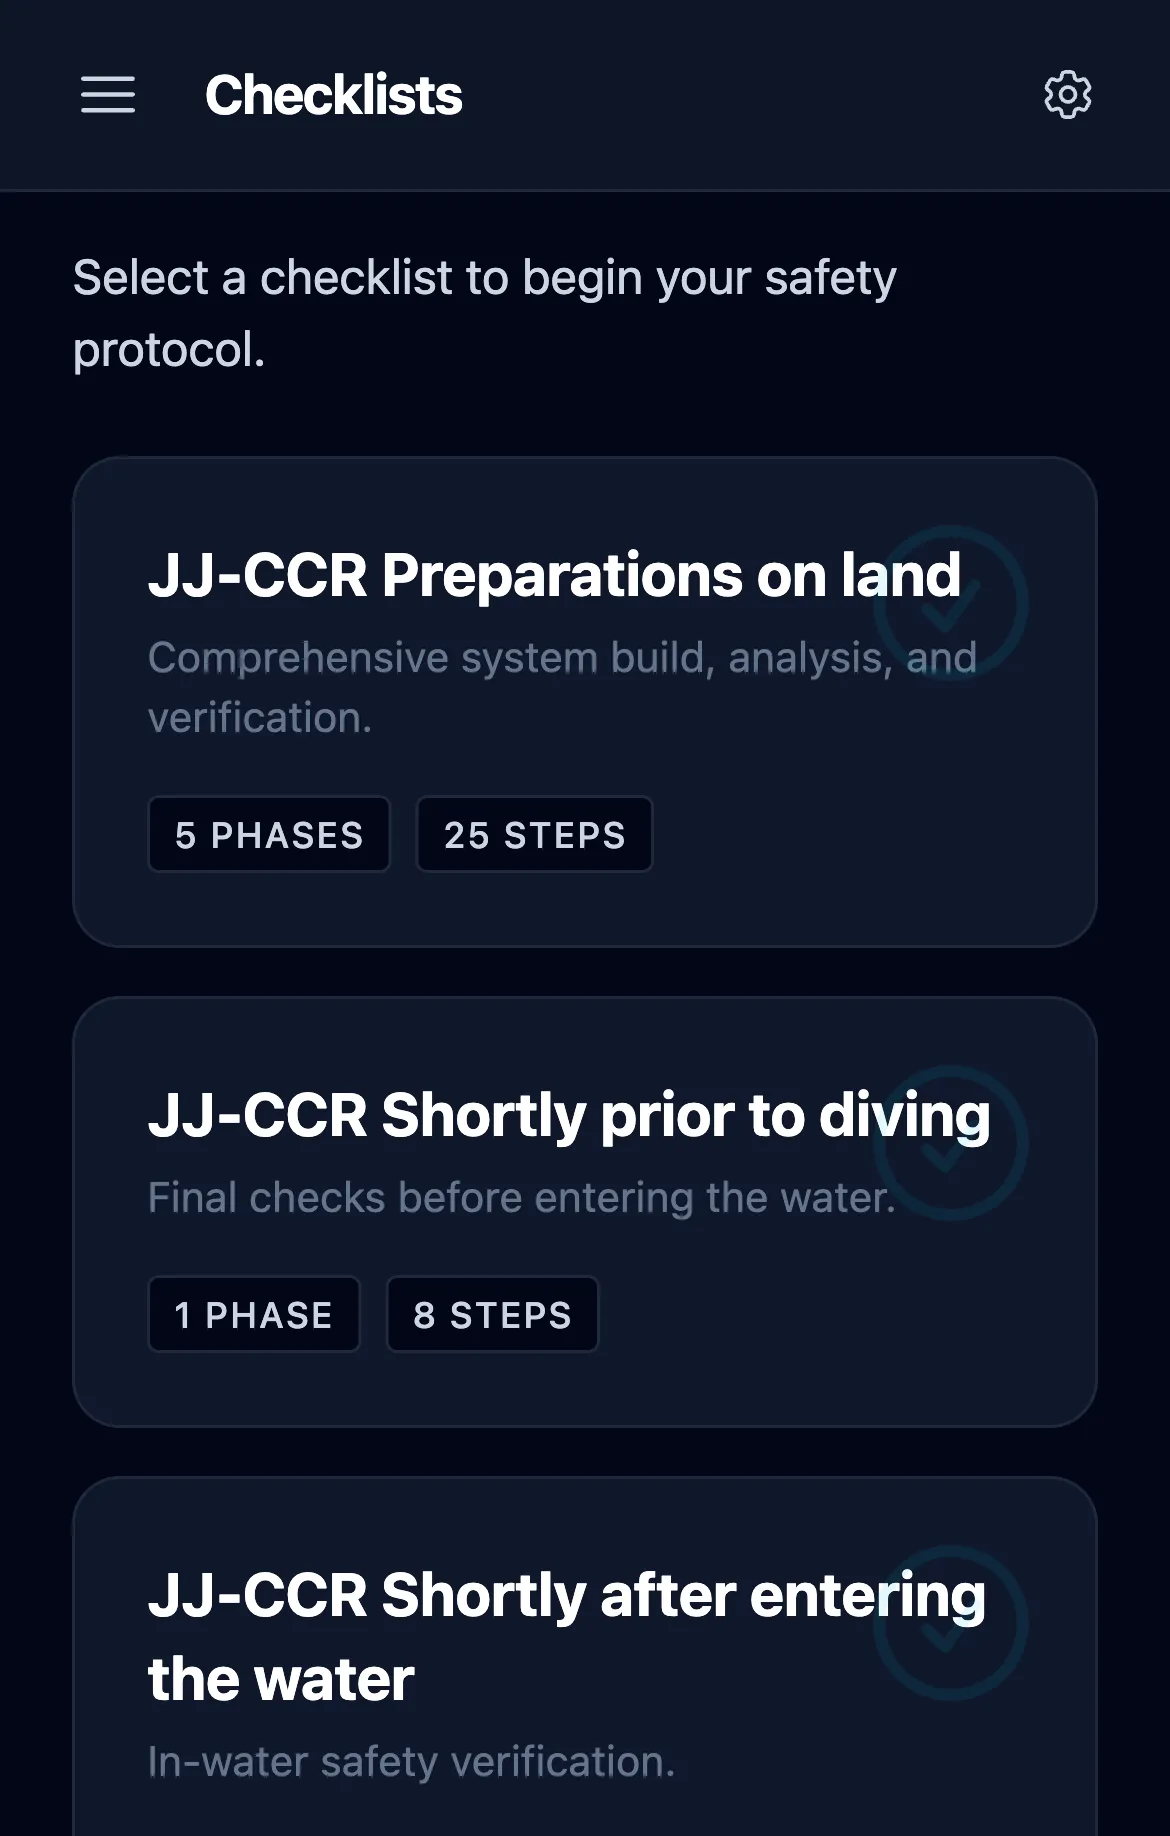
Four checklists ship with the app, 41 steps in total:
- JJ-CCR Preparations on land - full system build, analysis, and verification. Five phases: Assessment & Supplies, Assembly, System Checks, Integrity Tests, Electronics & Startup.
- JJ-CCR Shortly prior to diving - final checks before entering the water.
- JJ-CCR Shortly after entering the water - in-water safety verification.
- CHAOS (GUE) - pre-breathe rebreather check mnemonic: Controller calibration, HUD calibration, ADV test, O₂ / Solenoid check, Symptoms check.
The three JJ-CCR checklists are tailored to the JJ-CCR rebreather but the steps generalize to most backmount eCCR units. CHAOS is agency-neutral and intended for use during any rebreather pre-breathe.
4.2 Using a checklist
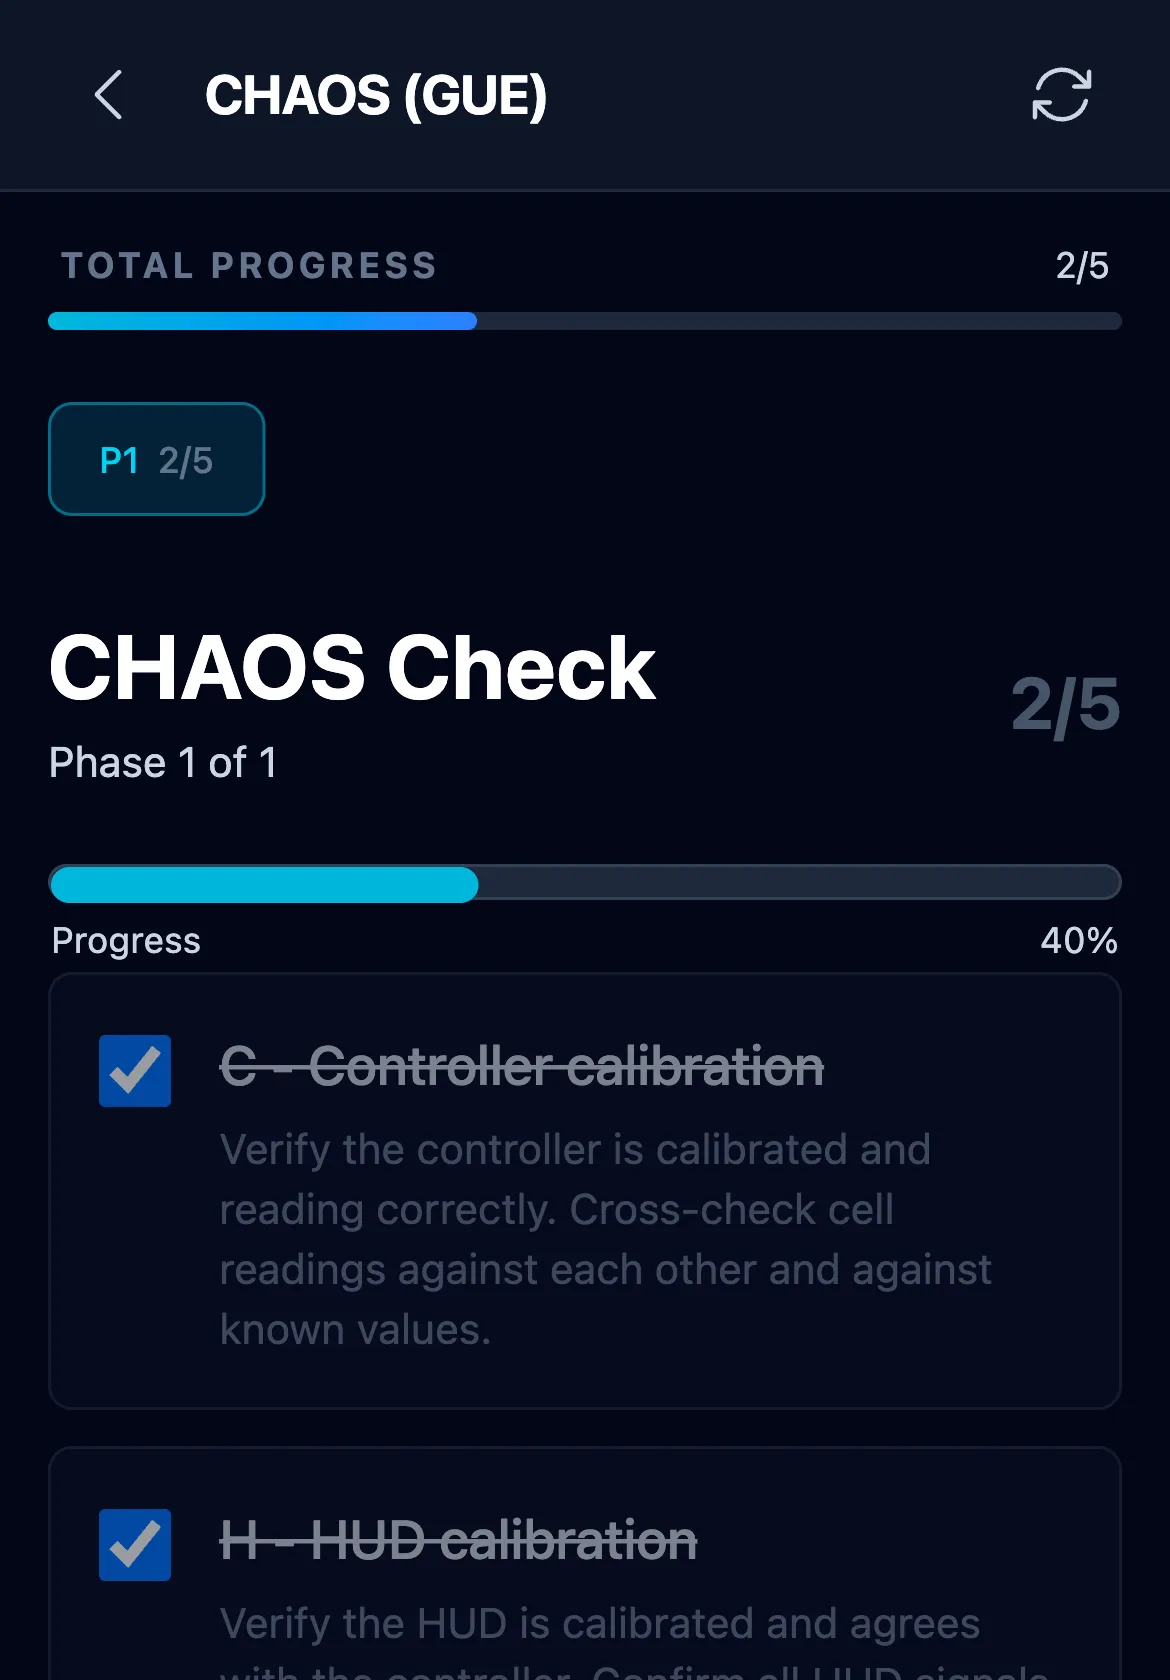
Tap a checklist on the selector screen to open it. The active-checklist screen has:
- Title and description at the top, with a back button that asks for confirmation if you have progress.
- Total progress bar - percentage of items completed across all phases.
- Phase navigation - current phase title, phase counter ("Phase 2 of 5"), and Previous / Next Phase buttons at the bottom.
- Step items - one row per check. Tap to toggle done. Some steps have expandable details (tap the row to reveal the extra guidance written by the author).
- Per-step timer - if the author enabled it on a step (pre-breathe, leak test, etc.), a countdown appears when you start it. It sounds an alarm when it reaches zero. Timers are manual start/stop - there is no auto-advance.
While a timer runs the screen is kept awake, so the countdown stays visible and the alarm reaches you; it is released as soon as you stop the timer or confirm a finished one. The countdown works from a finish time rather than counting seconds, so locking the phone or switching apps does not cost it any time: come back and it shows what is genuinely left, and if the time ran out while you were away the alarm starts the moment you return.
- Reset button - clears all checks in the current checklist (with confirmation).
- Complete button - when every step is done, this finishes the run, records an entry in the Dive Log (see below), and returns you to the selector.
Progress is persisted in localStorage - close the browser or switch apps, reopen, and you land back on the same phase with the same items checked. Exiting mid-checklist prompts a confirmation so you do not wipe progress accidentally.
Dive Log
Every time you finish a checklist with Complete, the app writes a summary entry to the Dive Log. Each entry records the checklist title, the date and time you completed it, items completed out of total, and how long the run took. The log keeps the last 50 entries.
The log lives on the selector screen (not inside the active checklist). Scroll to the bottom of the selector - if you have any entries, a Dive Log (N) button appears; tap it to expand and review past runs. Useful for spotting when you last ran the full pre-breathe or for tracking training consistency.
4.3 Custom checklist builder
From the selector screen, the gear icon opens the Manage Checklists view. From there, Create New Checklist launches the builder.
A custom checklist has:
- Name - required, shown in the selector list.
- Description - optional, a short line shown under the name in the selector.
- One or more phases. Each phase has a title and a list of steps. Use Add Phase to create a new phase, the trash icon to remove one.
- One or more steps per phase. Each step has:
- A required step description (the short text shown on the checklist row)
- Optional longer details (expands when tapped during use)
- An optional timer - toggle Enable timer to make the step time-bounded
From the manage view you can also Duplicate an existing checklist (a fast way to fork a default one and tweak it), Edit, or Delete. Default checklists can be deleted too - Reset to defaults restores them while leaving your custom checklists untouched.
Every custom checklist is included in Backup & Restore (see 1.4), so they survive device switches.
5. Safety Notice
Dive Tools is a planning and educational aid, not a substitute for proper training, certification, or judgment. Decompression theory is probabilistic - no algorithm, including Bühlmann ZHL-16C with gradient factors, guarantees a safe dive. Gas choices, bailout strategy, and gradient factors are conservative starting points, not absolute limits.
You are responsible for every dive you plan and execute. Always:
- Dive within your training and certification
- Cross-check critical calculations against your dive computer or a second planner
- Account for conditions the app cannot know: physiology, workload, thermal protection, dehydration, fatigue, recent dives, PFO and other DCS risk factors
- Carry adequate bailout and follow your agency's gas planning rules (minimum reserves, rock bottom, rule of thirds)
- Respect depth, narcosis, ppO₂, and density limits even when the app does not warn
- Analyze every cylinder before the dive, regardless of what the blending tool says
Dive Tools is provided as-is, without warranty of any kind. By using it, you accept that the author is not liable for any outcome of using the information it provides. The source code is open - if you find a bug that affects safety, please report it so others benefit from the fix.